3. The Operations Console for Dispatch
Last updated: September 8, 2026
This is the product half: the screen-by-screen "how do I actually do this" companion to Running Dispatch (the operational runbook). Running Dispatch tells you what to do and when; this doc shows you the clicks. When something here contradicts what's on your screen, trust the screen and flag it – the Operations Console moves faster than the doc.
The principles in Running Dispatch still apply here. Every action below serves them: we eat glass, we protect autonomous deliveries, words matter, and we're building for a future with no Supervisor in the vehicle.
What you can see
Your Operations Console is scoped to your Dispatch area. You have four areas in the left nav:
Area | What it's for |
|---|---|
Overview | The at-a-glance shift picture: active runs, on-shift drivers, in-flight quotes, the fleet map, and open alerts. |
Alerts | Everything the system wants your attention on, with the one or two actions each alert allows. |
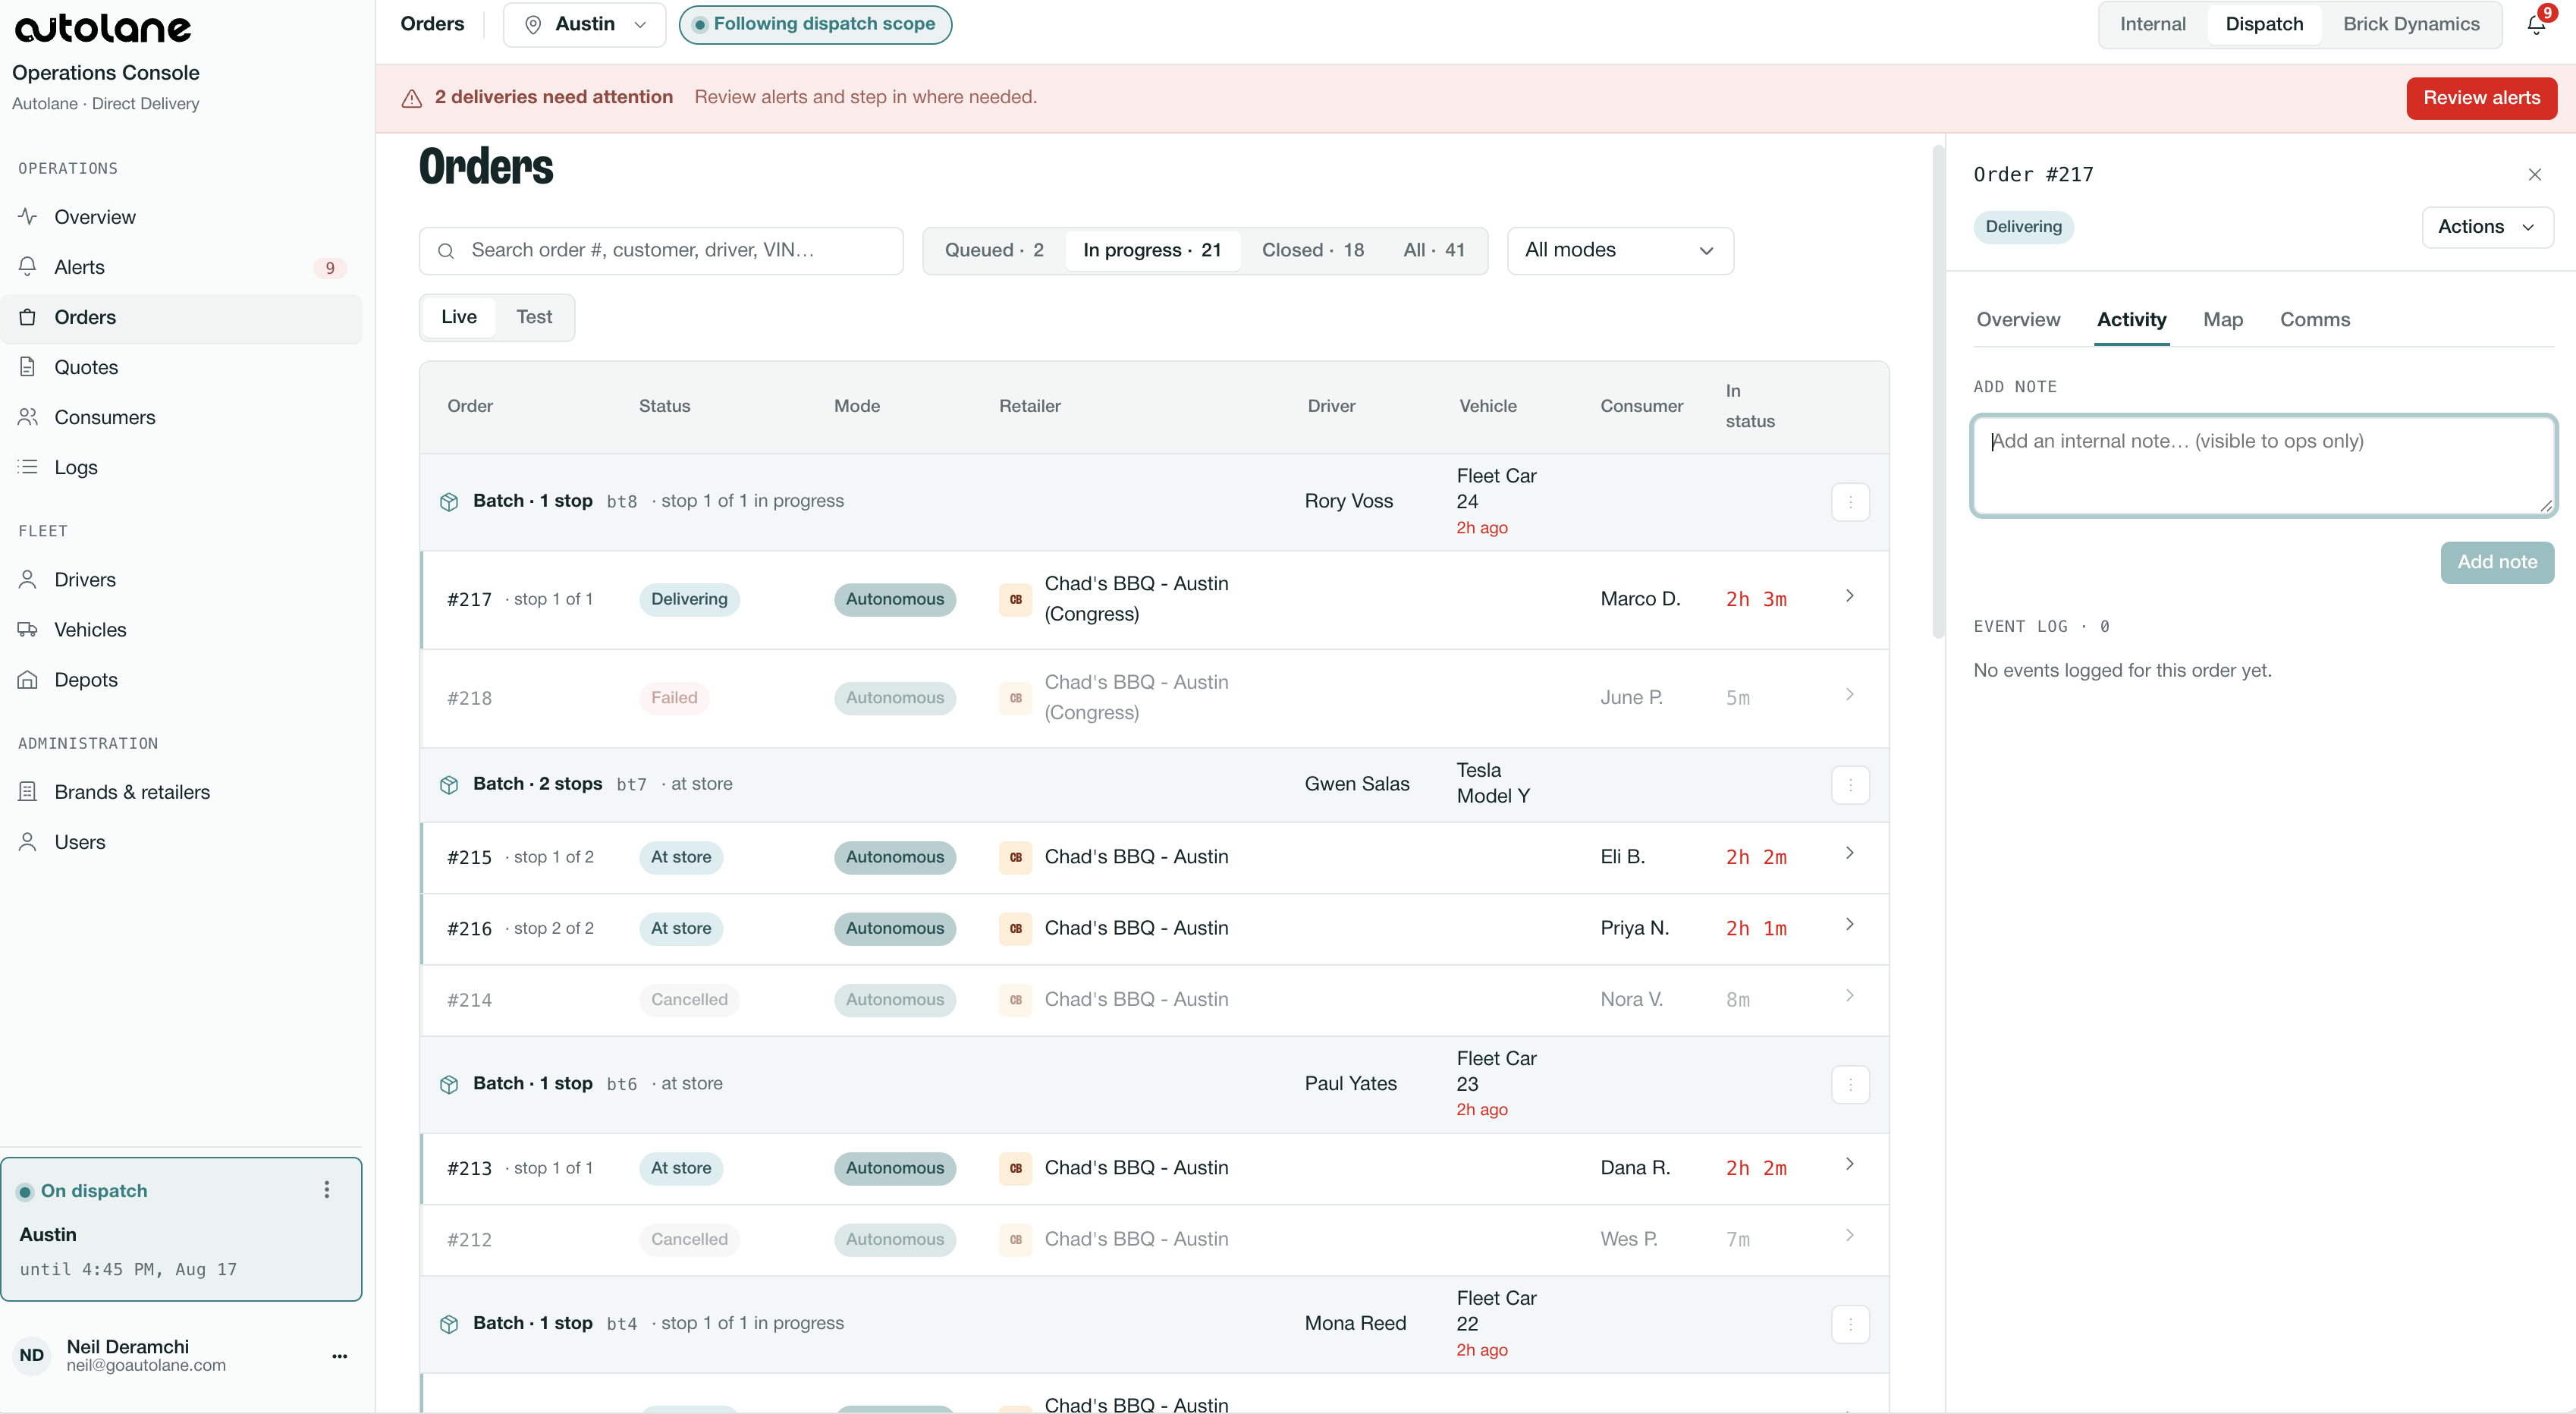
Orders | The live board of every order and run. This is where per-order actions live (reassign, advance state, change address, contact, open trunk). |
Drivers | Your roster. Put Supervisors on and off shift, and assign them to vehicles. This is your shift-prep home. |
Going on Dispatch
Going on Dispatch is the first thing you do every shift, before anything else. It puts you on the record and switches on the full set of dispatch-scoped tools, including the Operations Console's call routing. Until you're on dispatch, you're not fully equipped to run the shift.
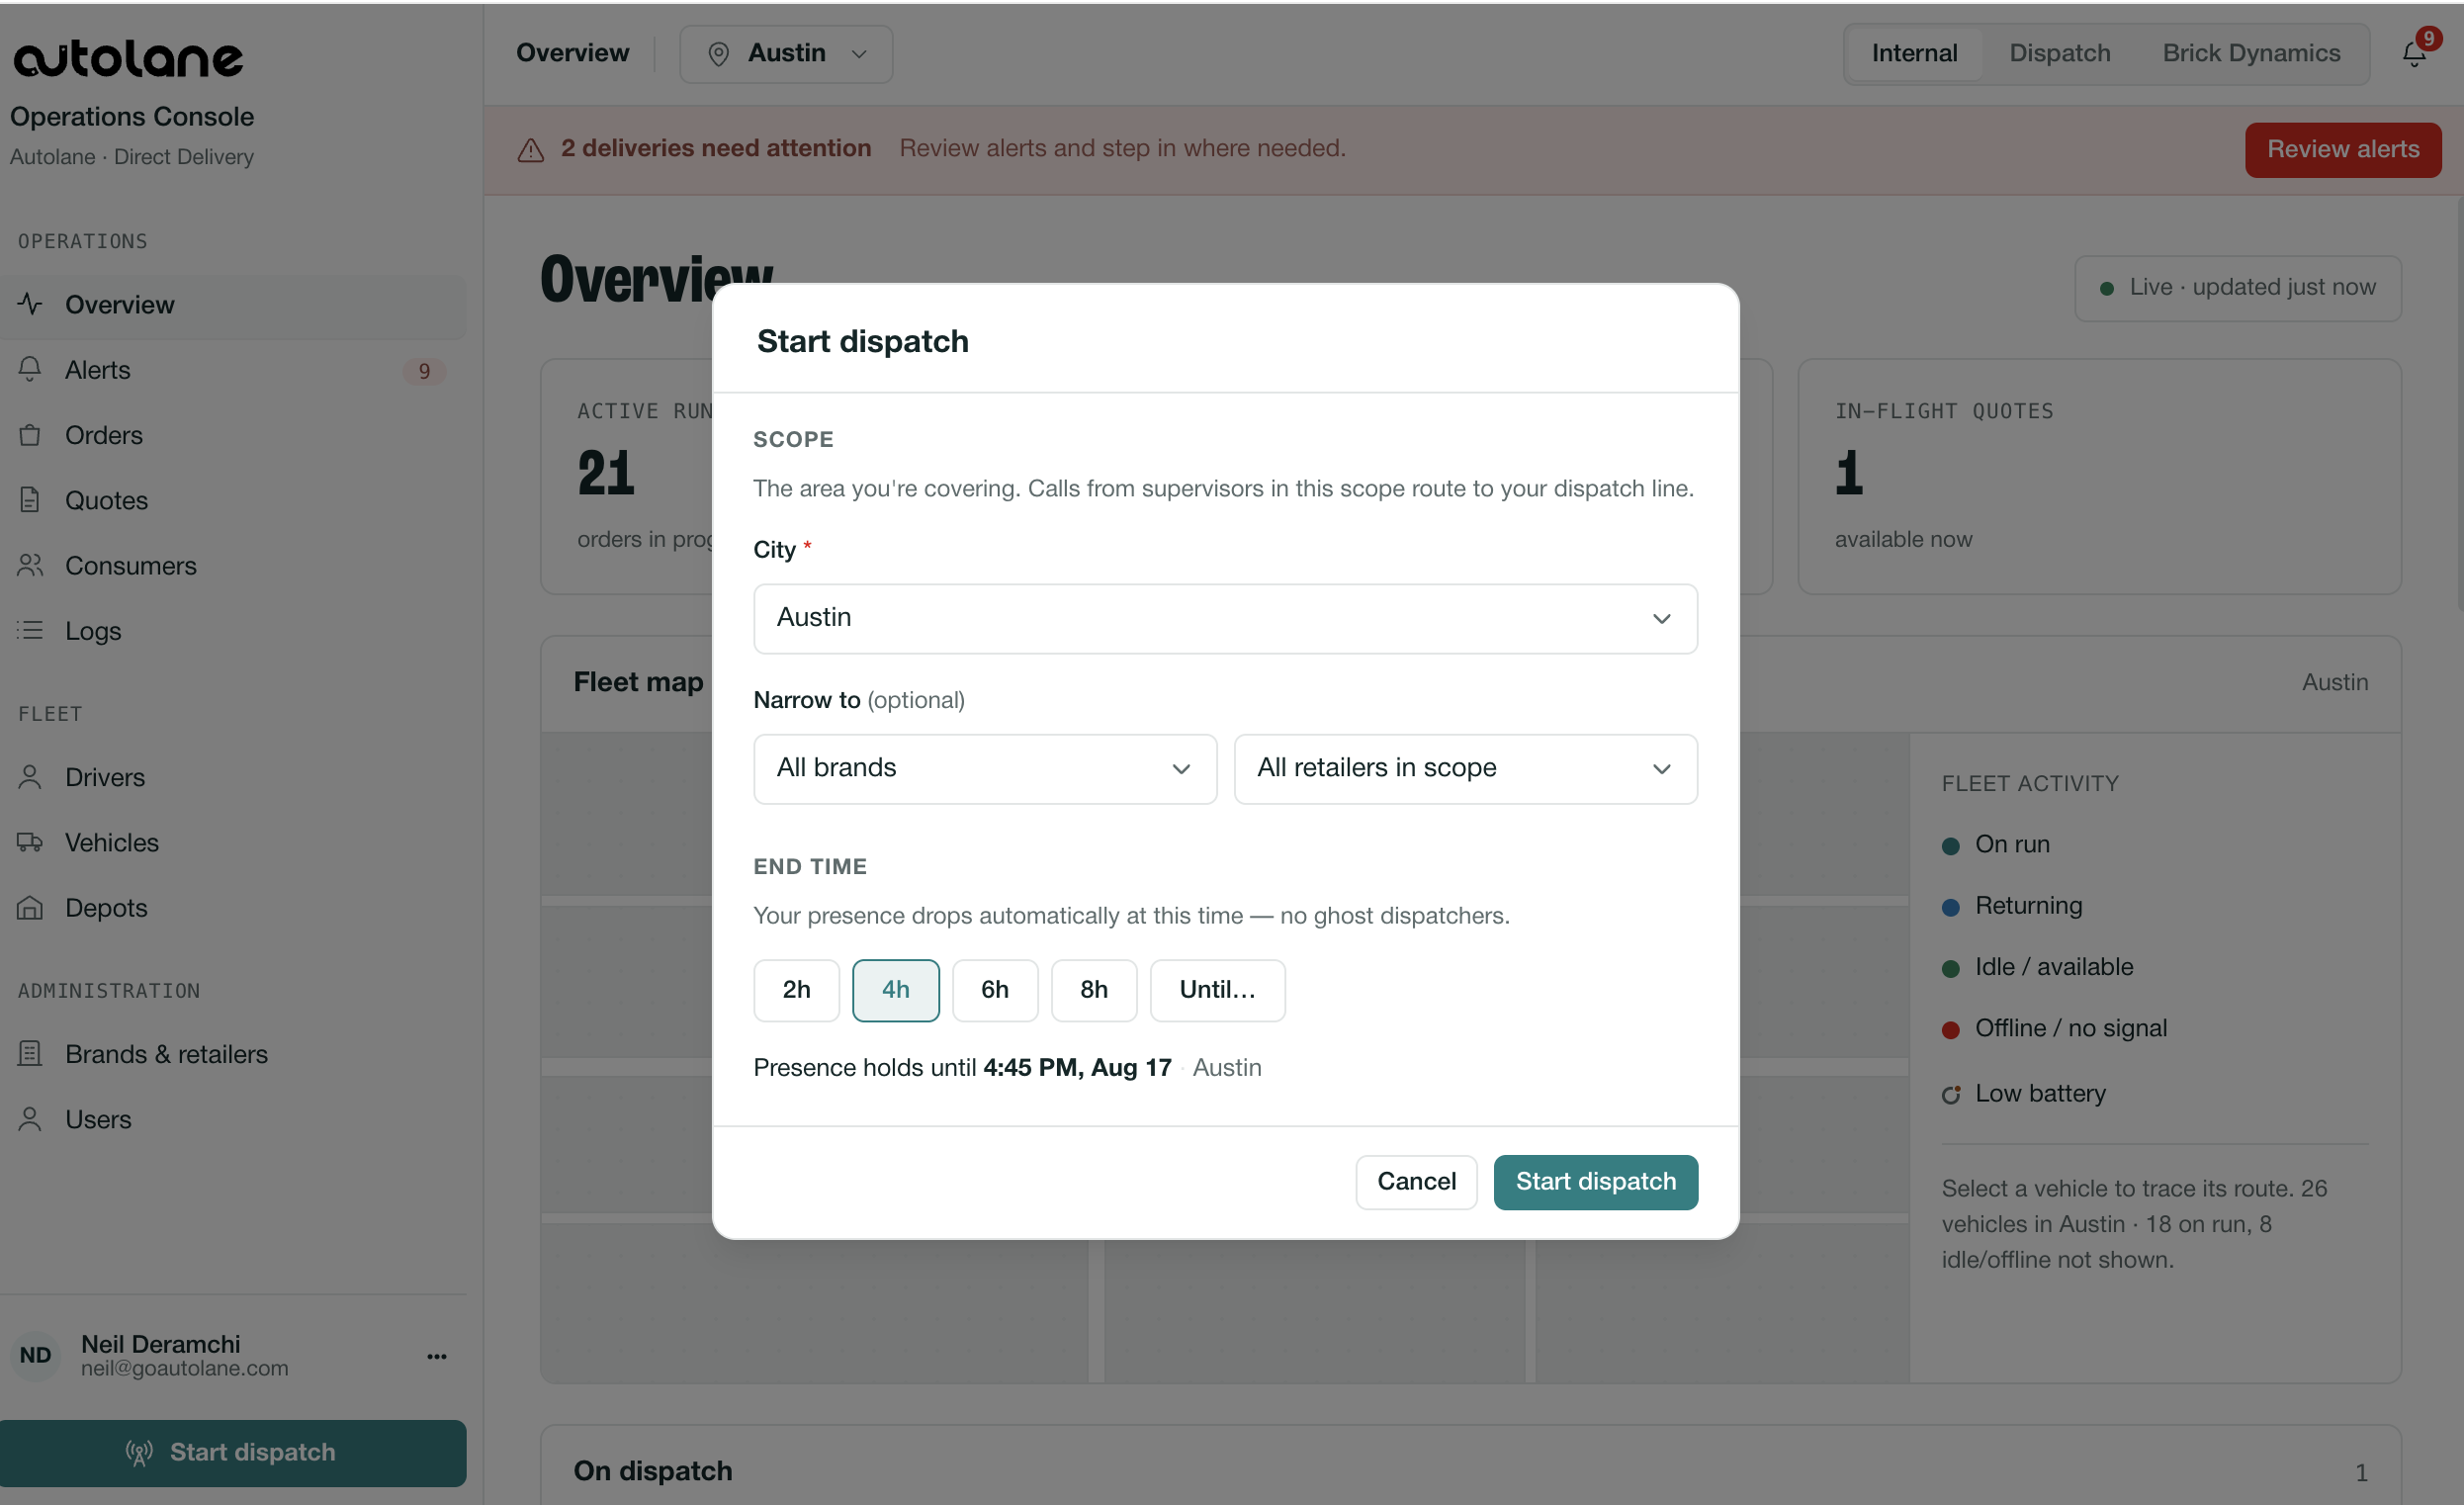
Open the Start Dispatch control on your profile block (bottom of the sidebar).
Set your scope (the retailers / city you're covering) and an end time for the session.
Confirm. Your profile block now shows you're on dispatch.
What it gives you:
Accurate logging: your actions on the shift are attributed to you.
Dispatch-scoped tools: the full set of actions you need on shift, in one place.
Call routing: click-to-call to Supervisors and End Users connects through the system with your number protected. You never see or need an End User's raw number; the system connects the call for you.
Starting a Supervisor's shift
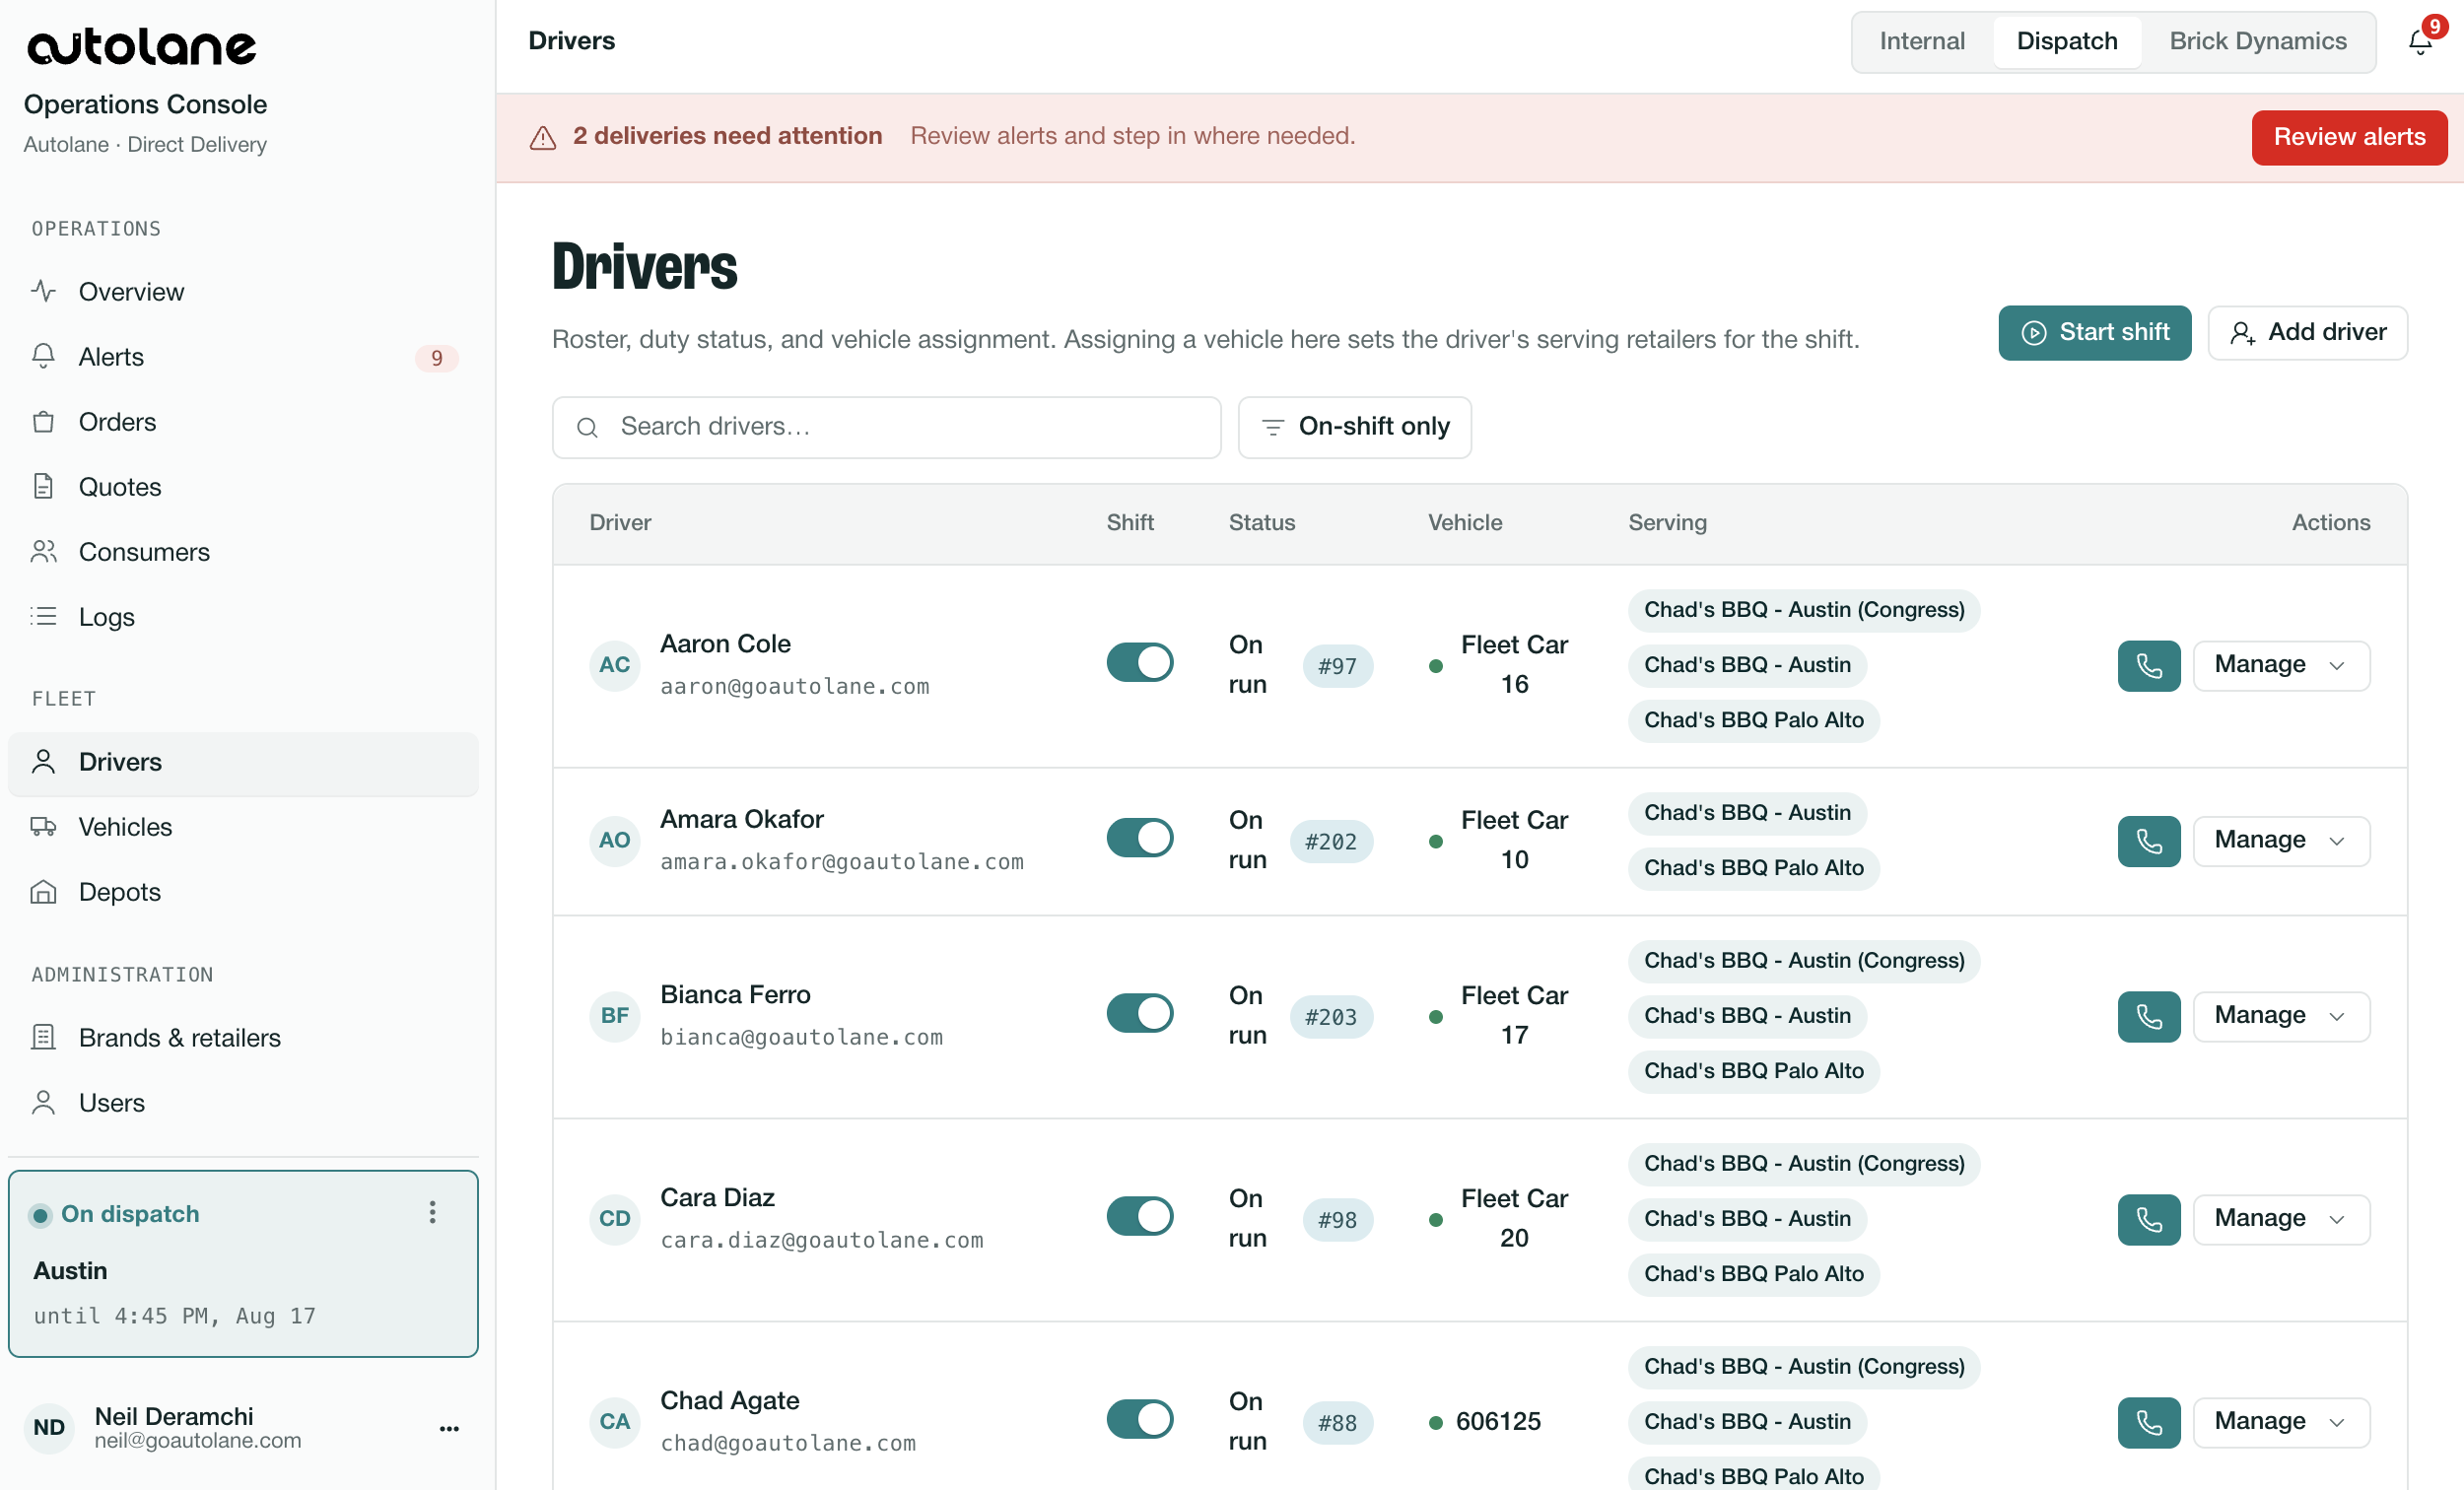
Getting a Supervisor from "here at the depot" to "assigned and ready." You work entirely from the Drivers tab.
In the Drivers tab, find the Start Shift button on the right.
Select the Supervisor and choose their Retailer for the shift.
Pick their Vehicle. You'll only see vehicles already permissioned for that retailer – that list is set by Autolane and you can't add to it. If the car you expect isn't there, it isn't permissioned; escalate to Autolane.
Confirm. The Supervisor is now assigned to that vehicle for that retailer.
The Supervisor does their inspection and heads to the store. You put them on duty when they arrive (next section).
Taking a Supervisor off duty
At the scheduled end of shift.
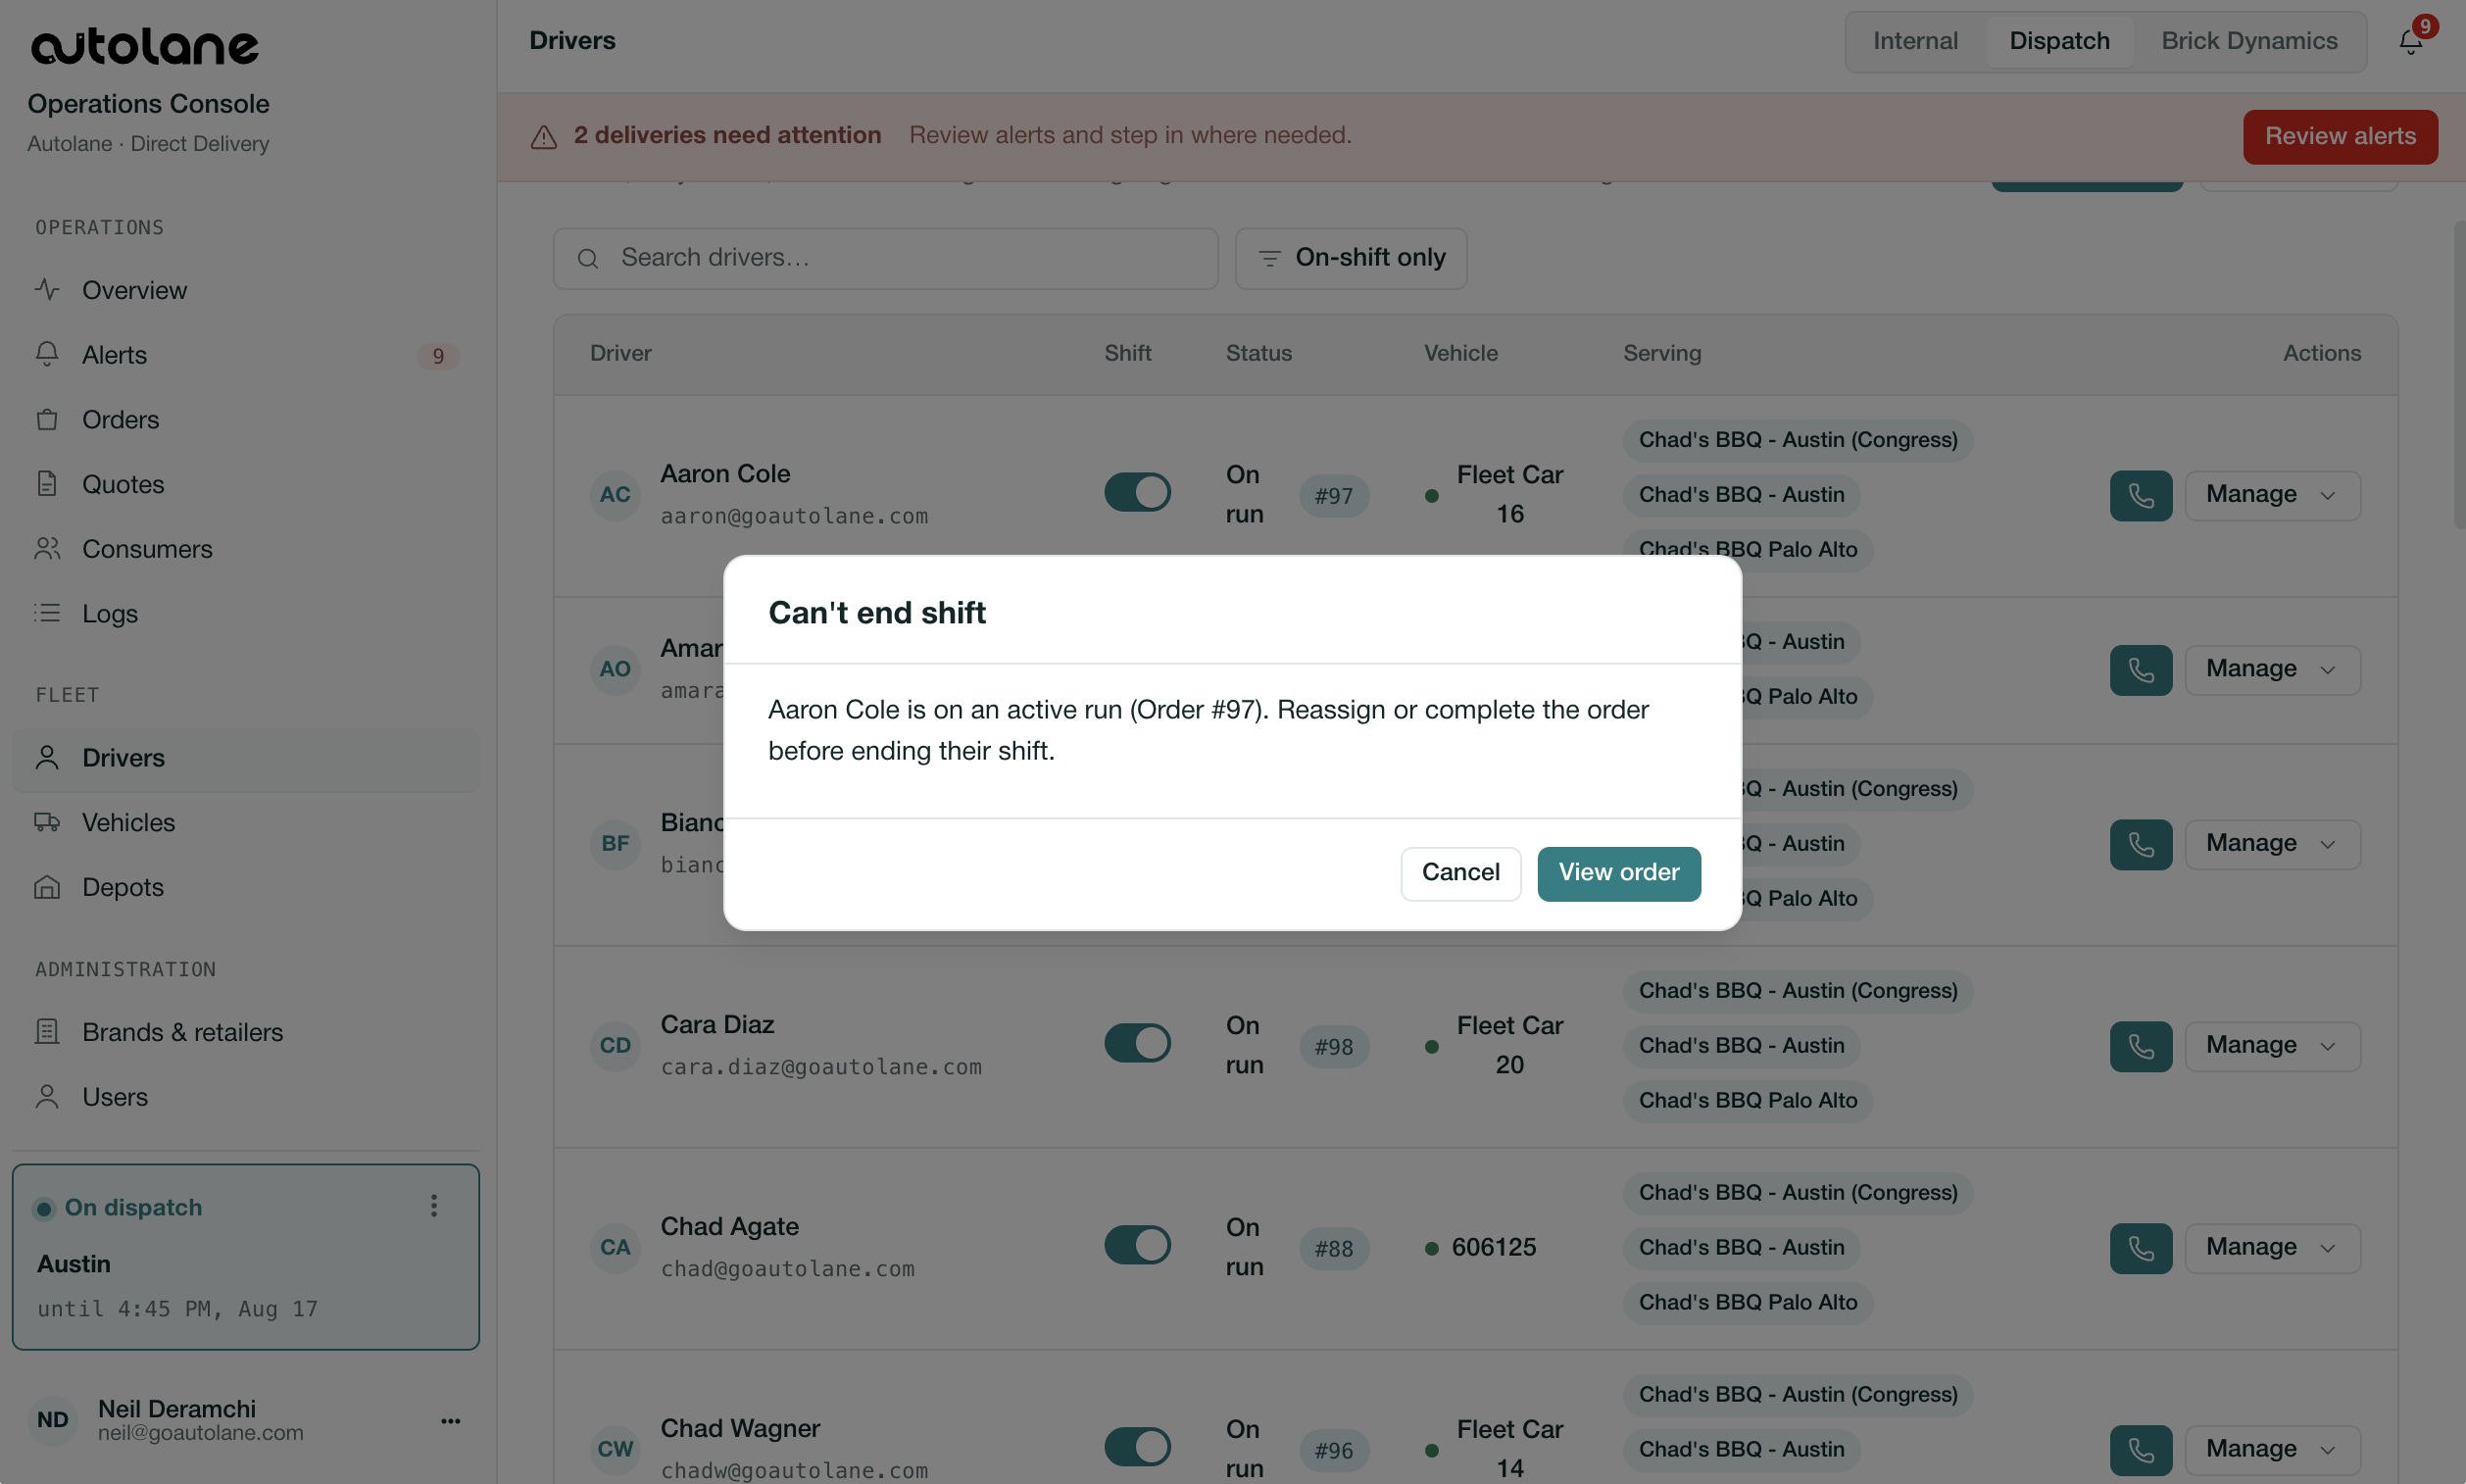
In Drivers, toggle the Supervisor off shift.
As they return to the depot, unassign them from the vehicle.
You can't take a Supervisor off shift while they're on an active run – the Operations Console blocks it on purpose, so a delivery is never orphaned mid-run. Wait for the run to complete, or work the run first (advance or reassign it) if it's stuck.
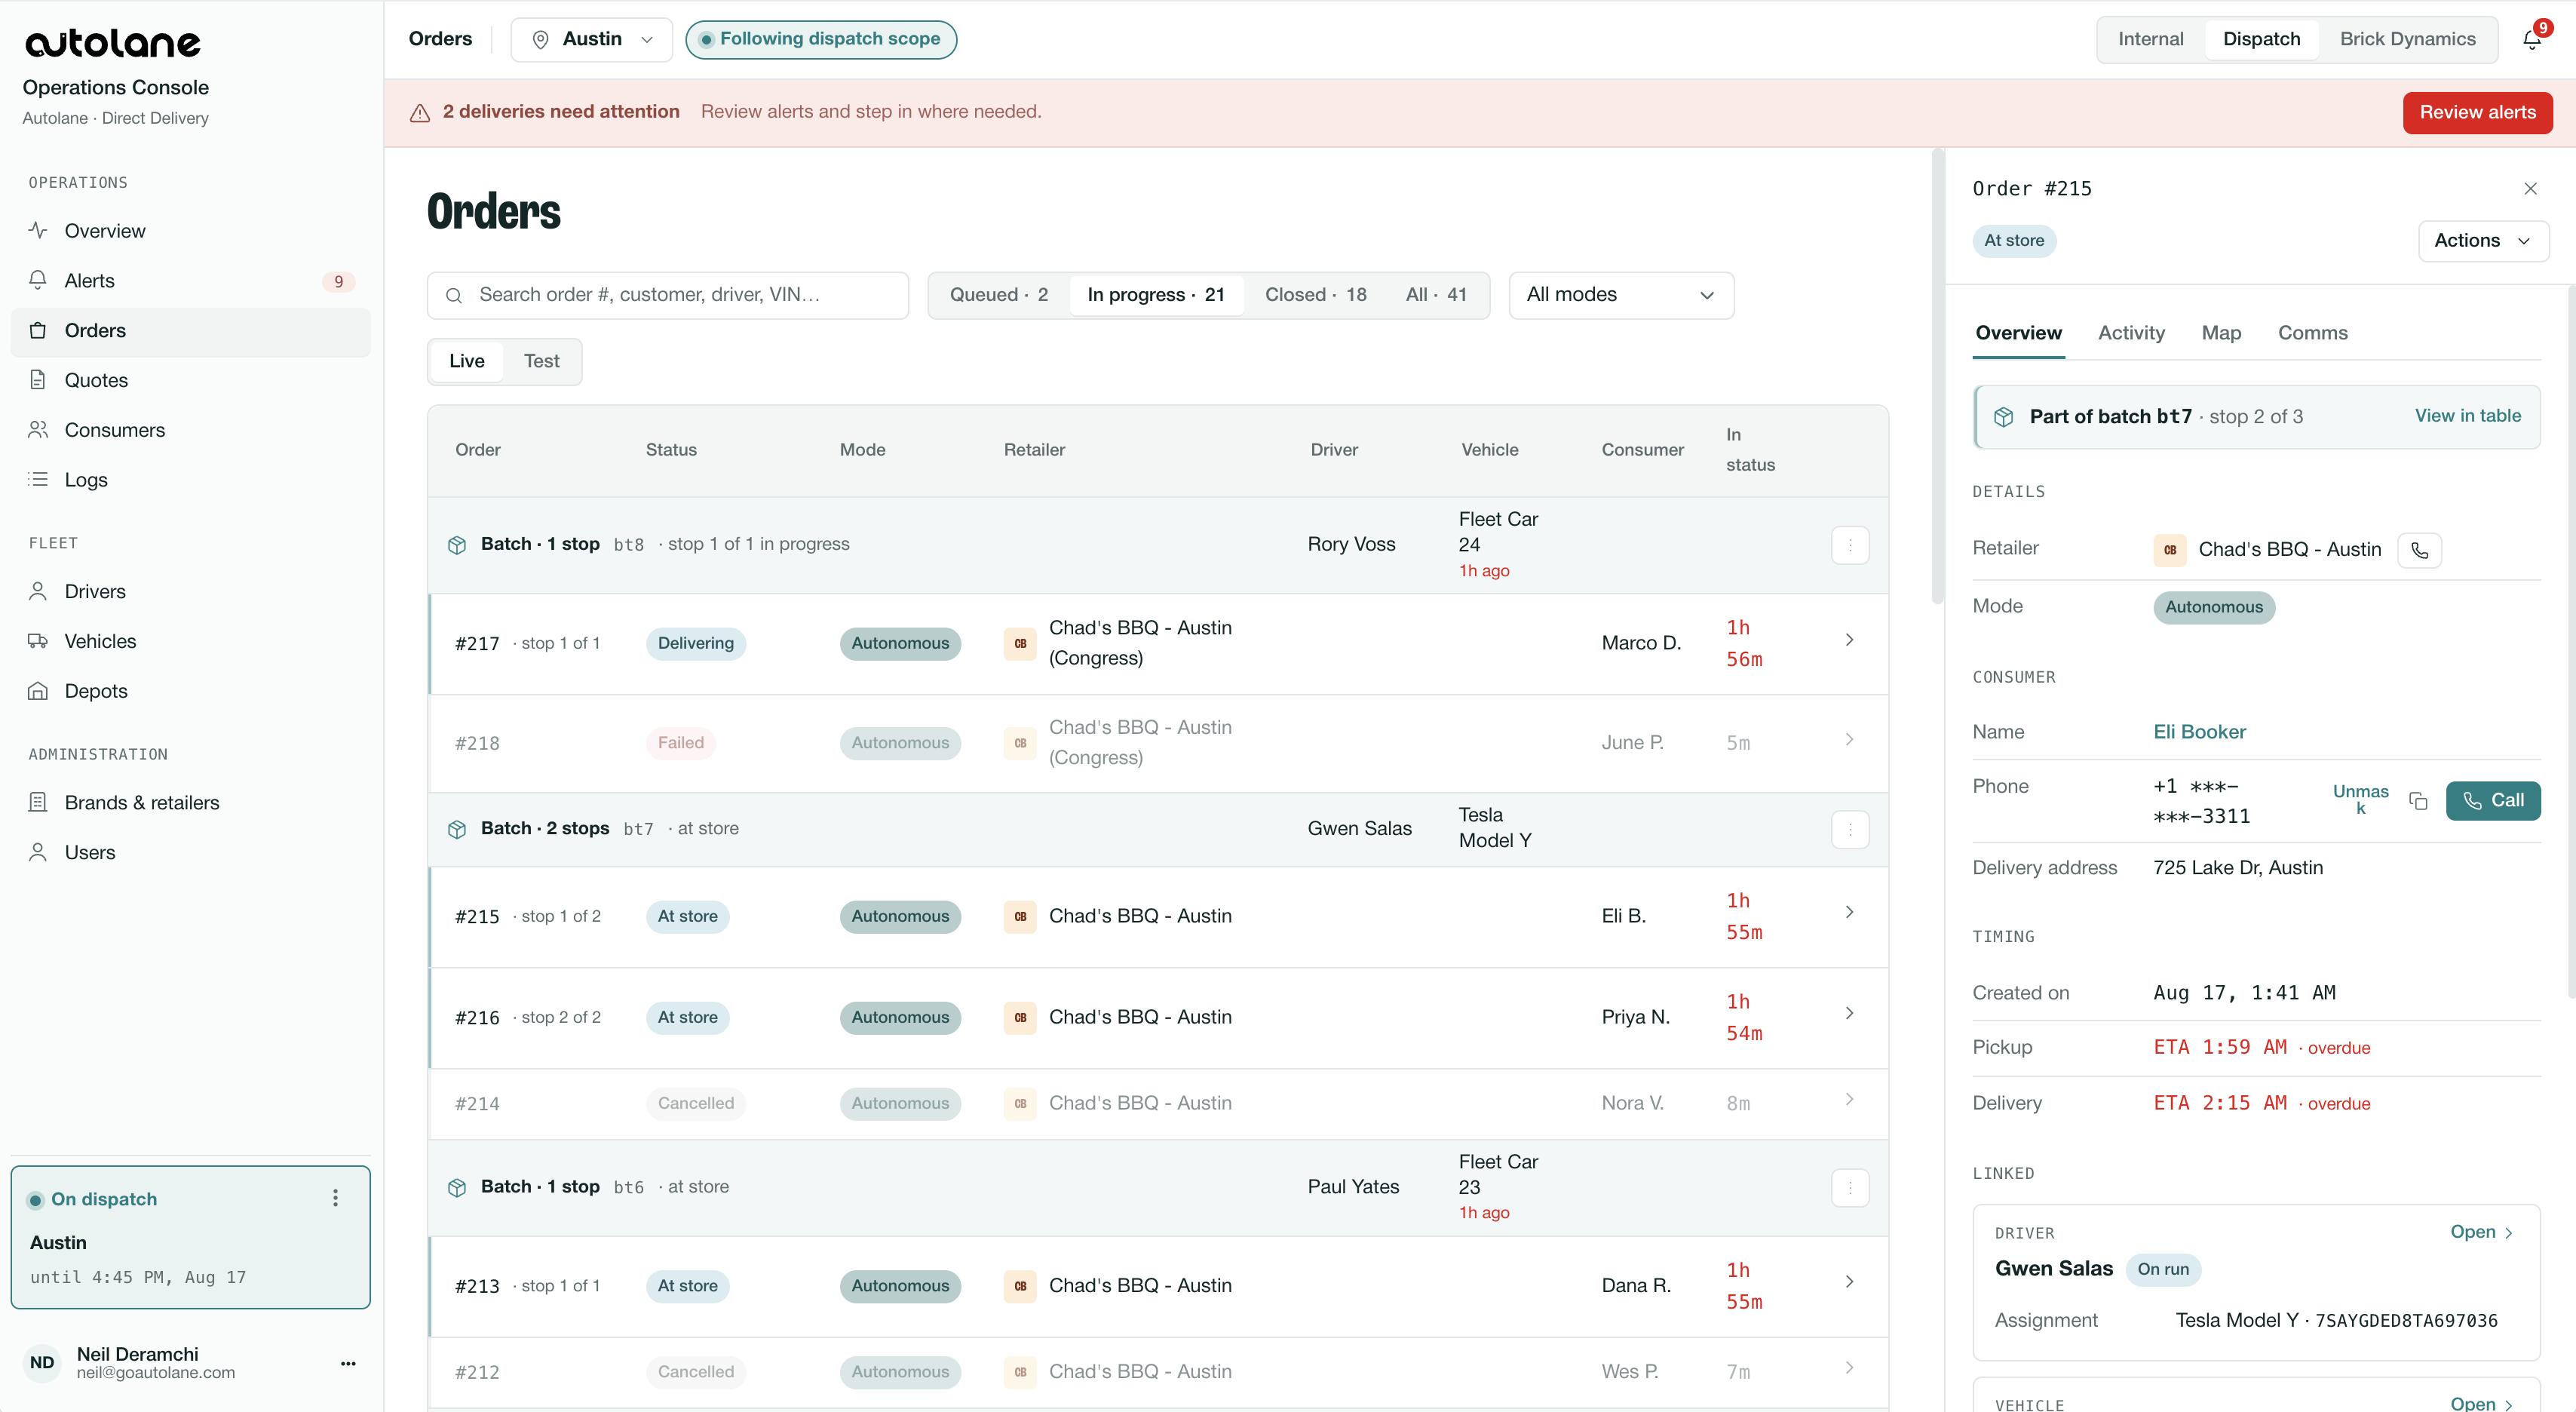
Reading the Orders board
Before the order workflows, know how the board is laid out.
Orders are grouped by status so you can see at a glance what's queued, in progress, and done.
Batches (multiple orders on one run) show as a grouped set, not scattered singles – the pickup leg is shared, the delivery legs are sequential.
Each stop carries its own lifecycle state (e.g. en route to store, at store, en route to customer, arrived, delivered).
Open an order or run to get its detail view, where the Actions menu lives (top of the pop-up). Every per-order workflow below starts there.
Reassigning an order
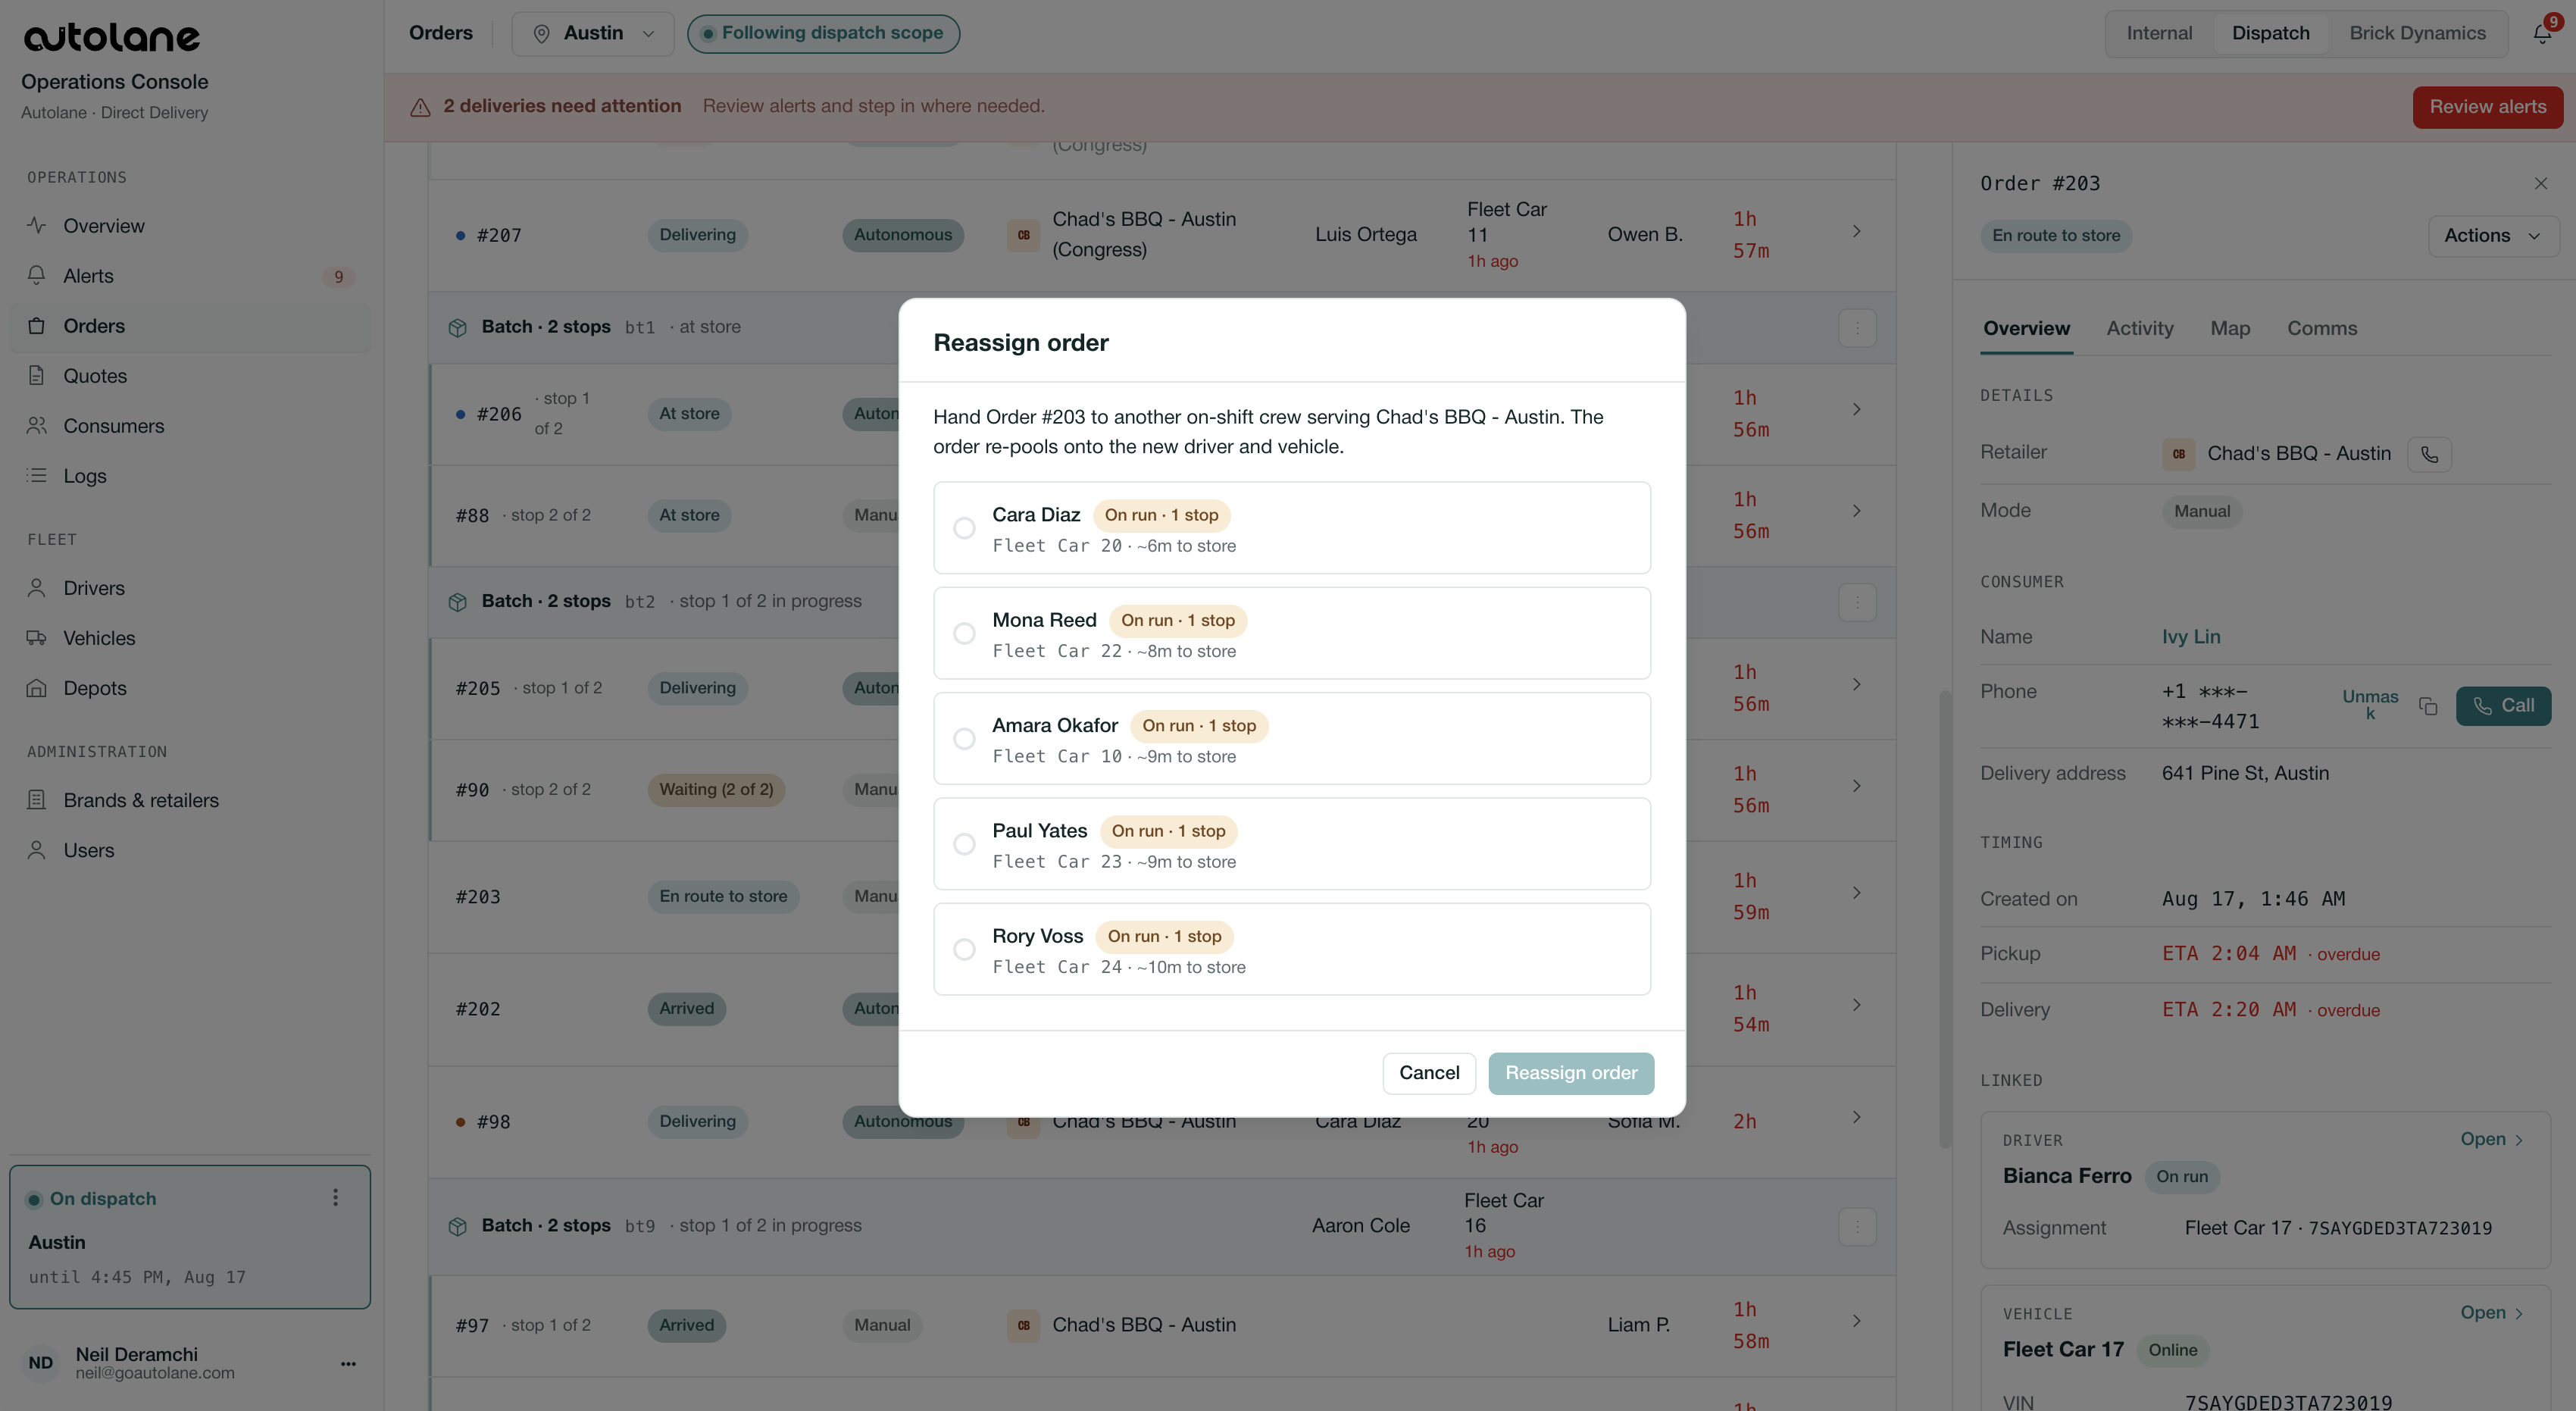
Moving an order off one Supervisor and onto another. You can only do this before the order is loaded – once the food is physically in a vehicle, reassignment is blocked; there's no moving loaded food between cars.
In Orders, open the order (or run) that's on the wrong Supervisor.
Open Actions → Reassign.
Pick the new Supervisor from the eligible list. The picker only shows Supervisors who are on shift and whose vehicle is permissioned for that retailer – so it won't let you assign to someone who can't take it. If the person you want isn't listed, they're either off shift or not permissioned for that retailer; fix that first (put them on shift, assigned to the correct retailer).
Confirm. Note the reassignment reason in the Reassignment flow.
If it's already loaded: don't try to move it – the Supervisor who has it completes the delivery. Reassignment is off the table at that point (protect the delivery, eat the glass). Note it, and escalate if the assignment is genuinely wrong for the run.
Advancing a delivery state
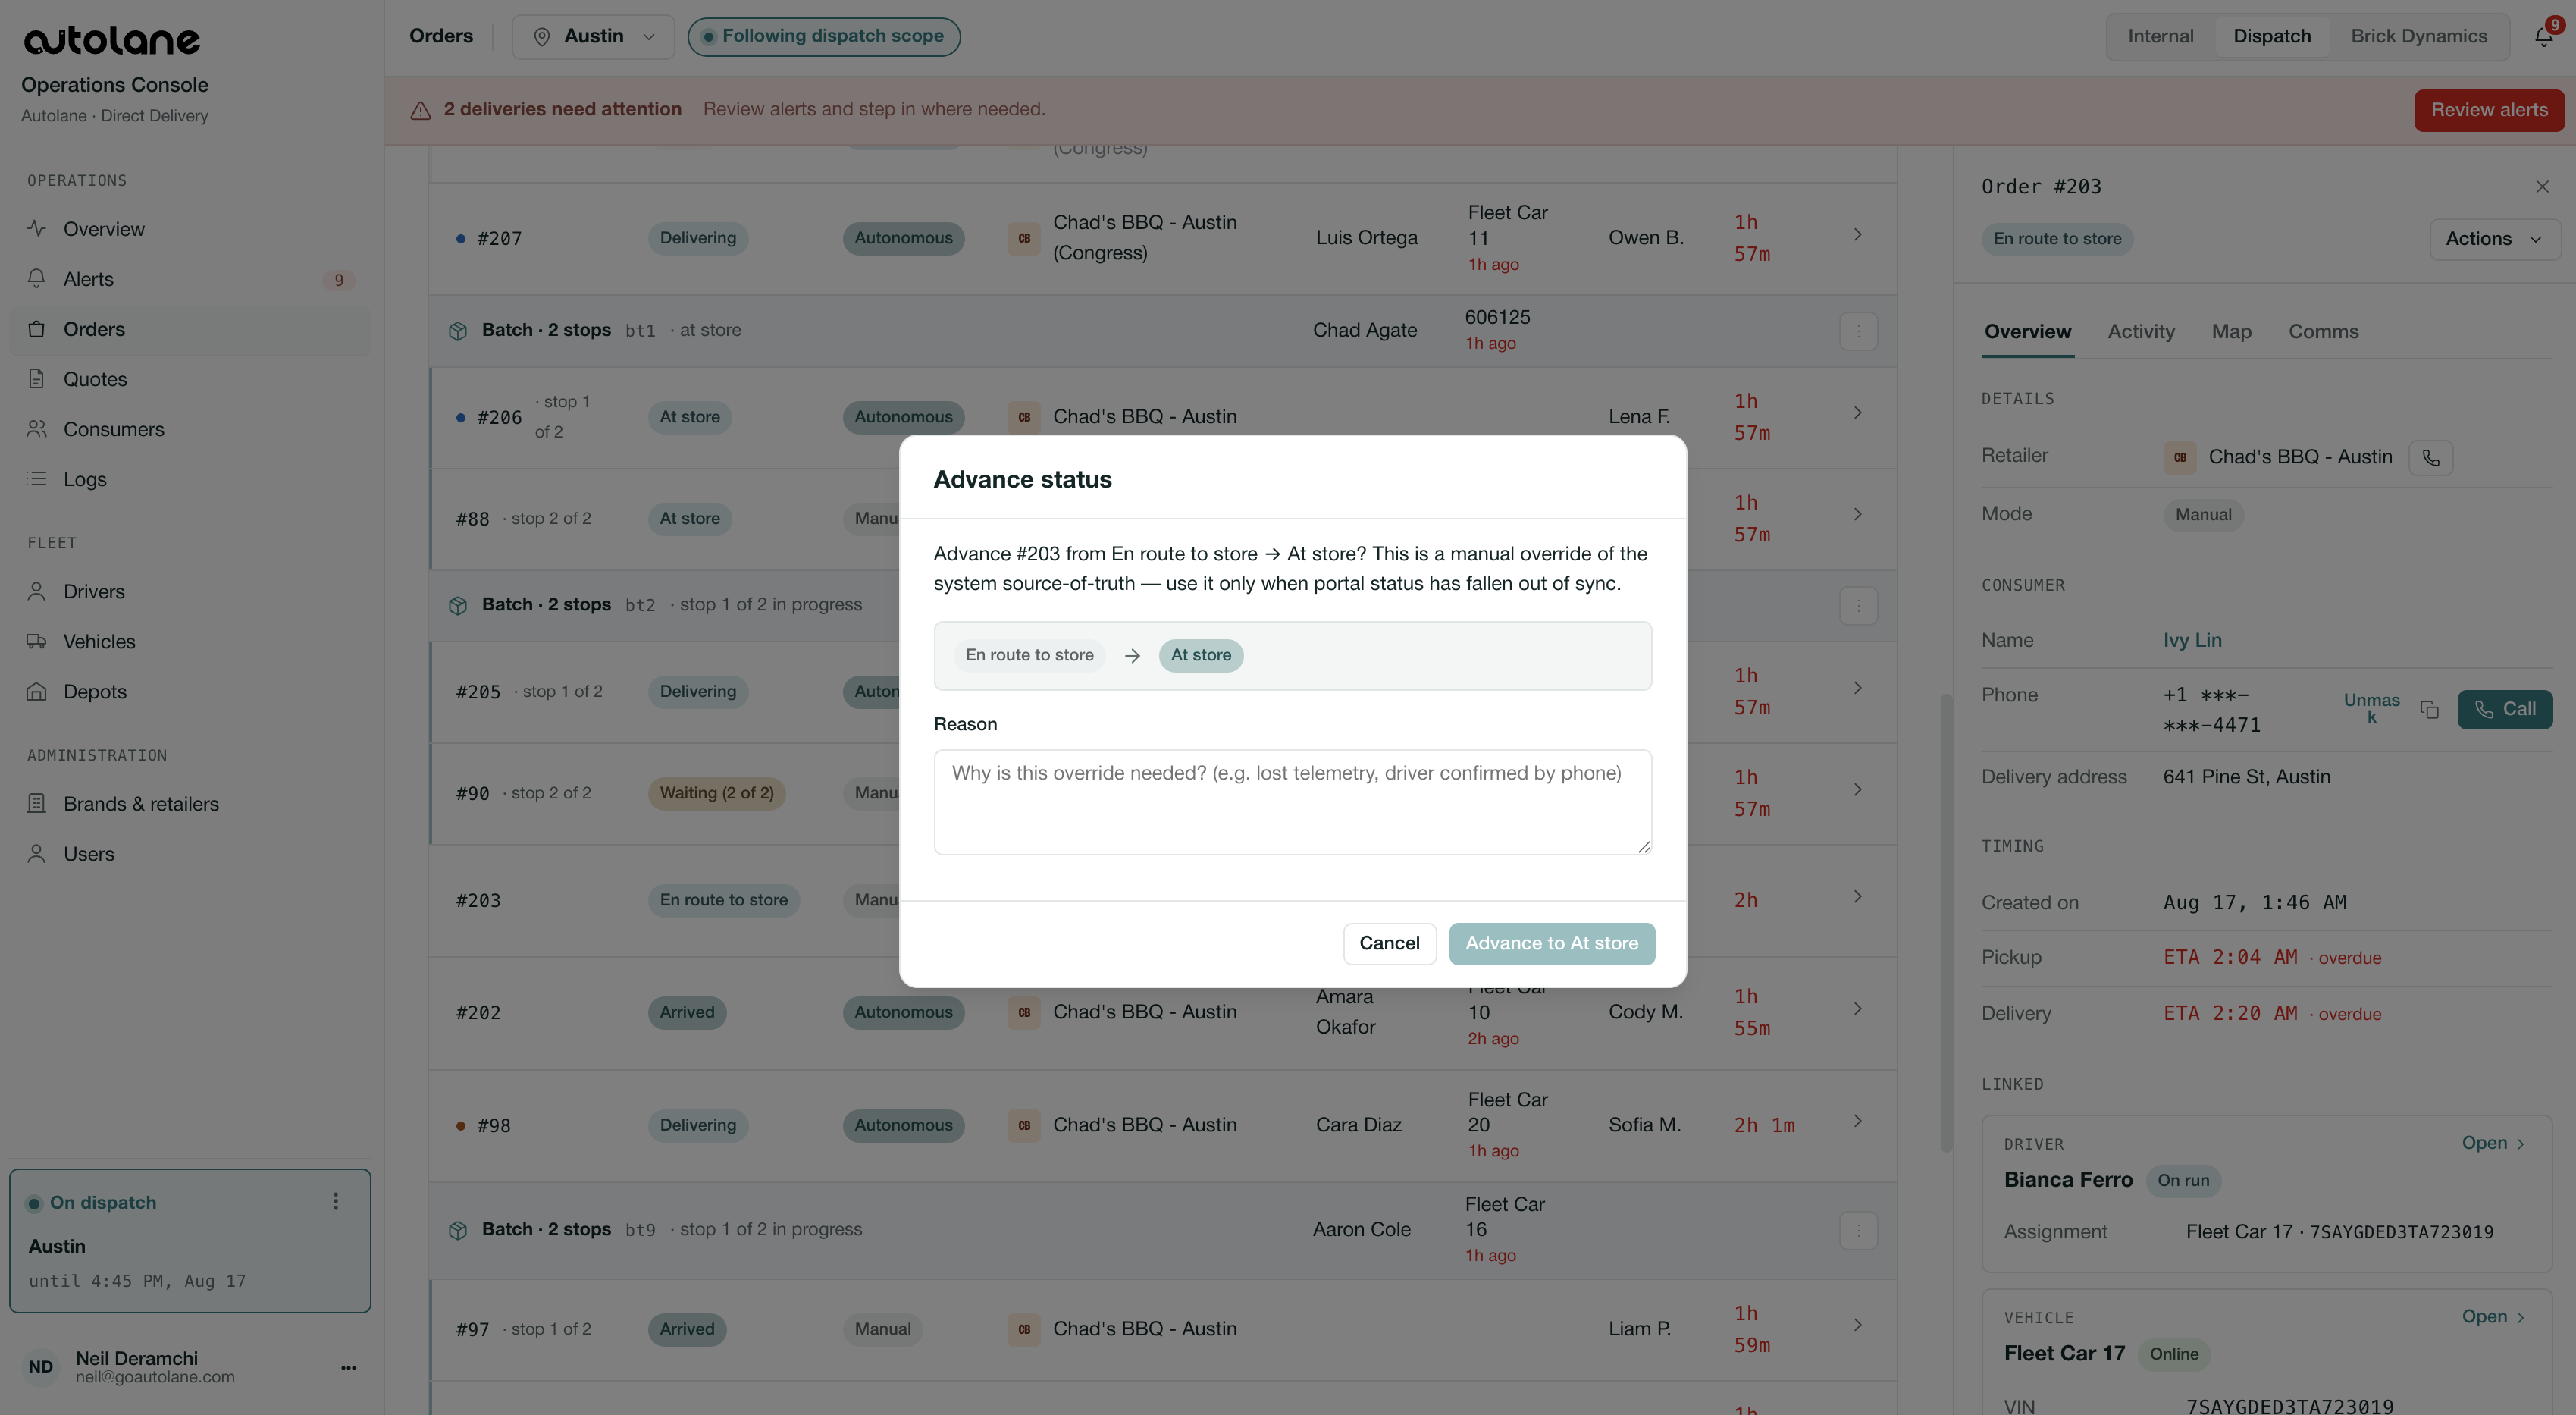
When a state won't fire on its own – most commonly "Arrived at customer," which triggers on the ~100 m property geofence and sometimes needs a nudge.
First try the simple fix: have the Supervisor physically cross the geofence.
If it still won't fire, in Orders open the run.
Actions → Advance Status (top right of the pop-up).
Advance to the correct state. Note why you did it.
Only advance a state that's genuinely true on the ground. Advancing a state the vehicle hasn't actually reached breaks the End User's tracking and violates the principle of persevering autonomous deliveries.
Changing a delivery address
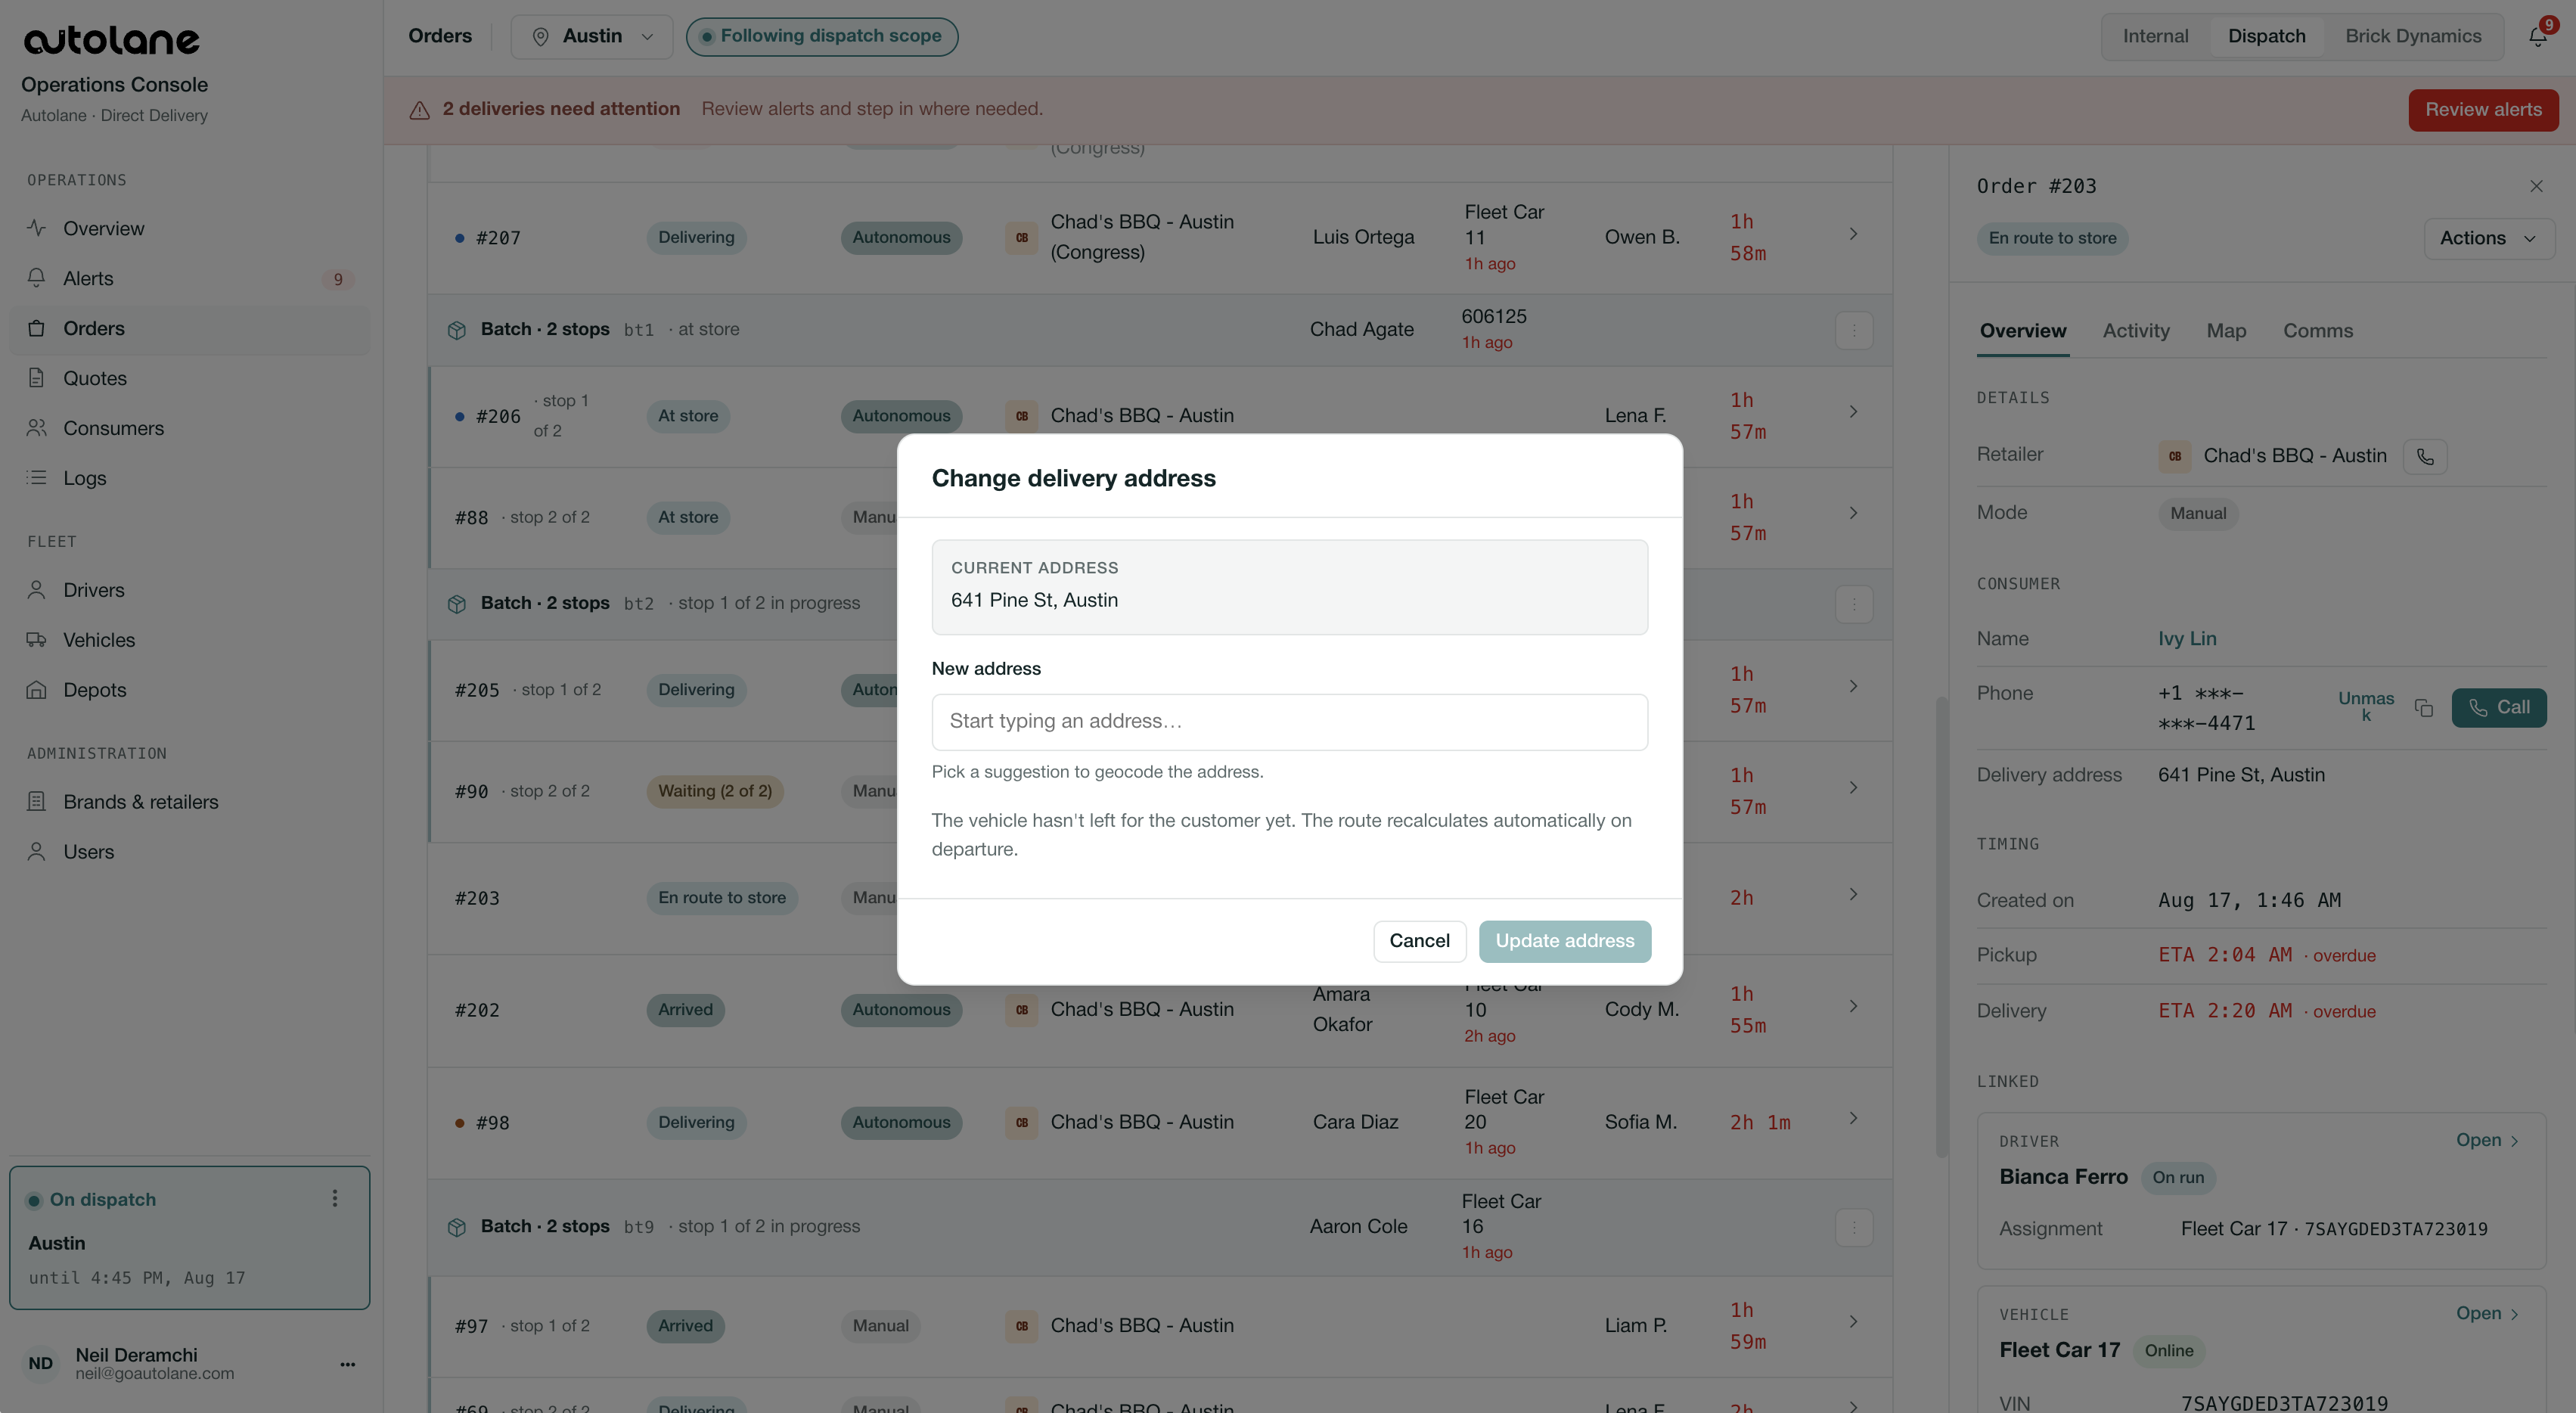
When the address is wrong or missing. Confirm the correct address first – call the End User if you need to (that's your call to make, not the Supervisor's).
In Orders, open the run.
Actions → Change delivery address.
Enter the confirmed address and save.
Check-in with the Supervisor to make sure their navigation picks up the change; if telemetry or nav is stale, they may need to override manually (Google Maps) and complete the run.
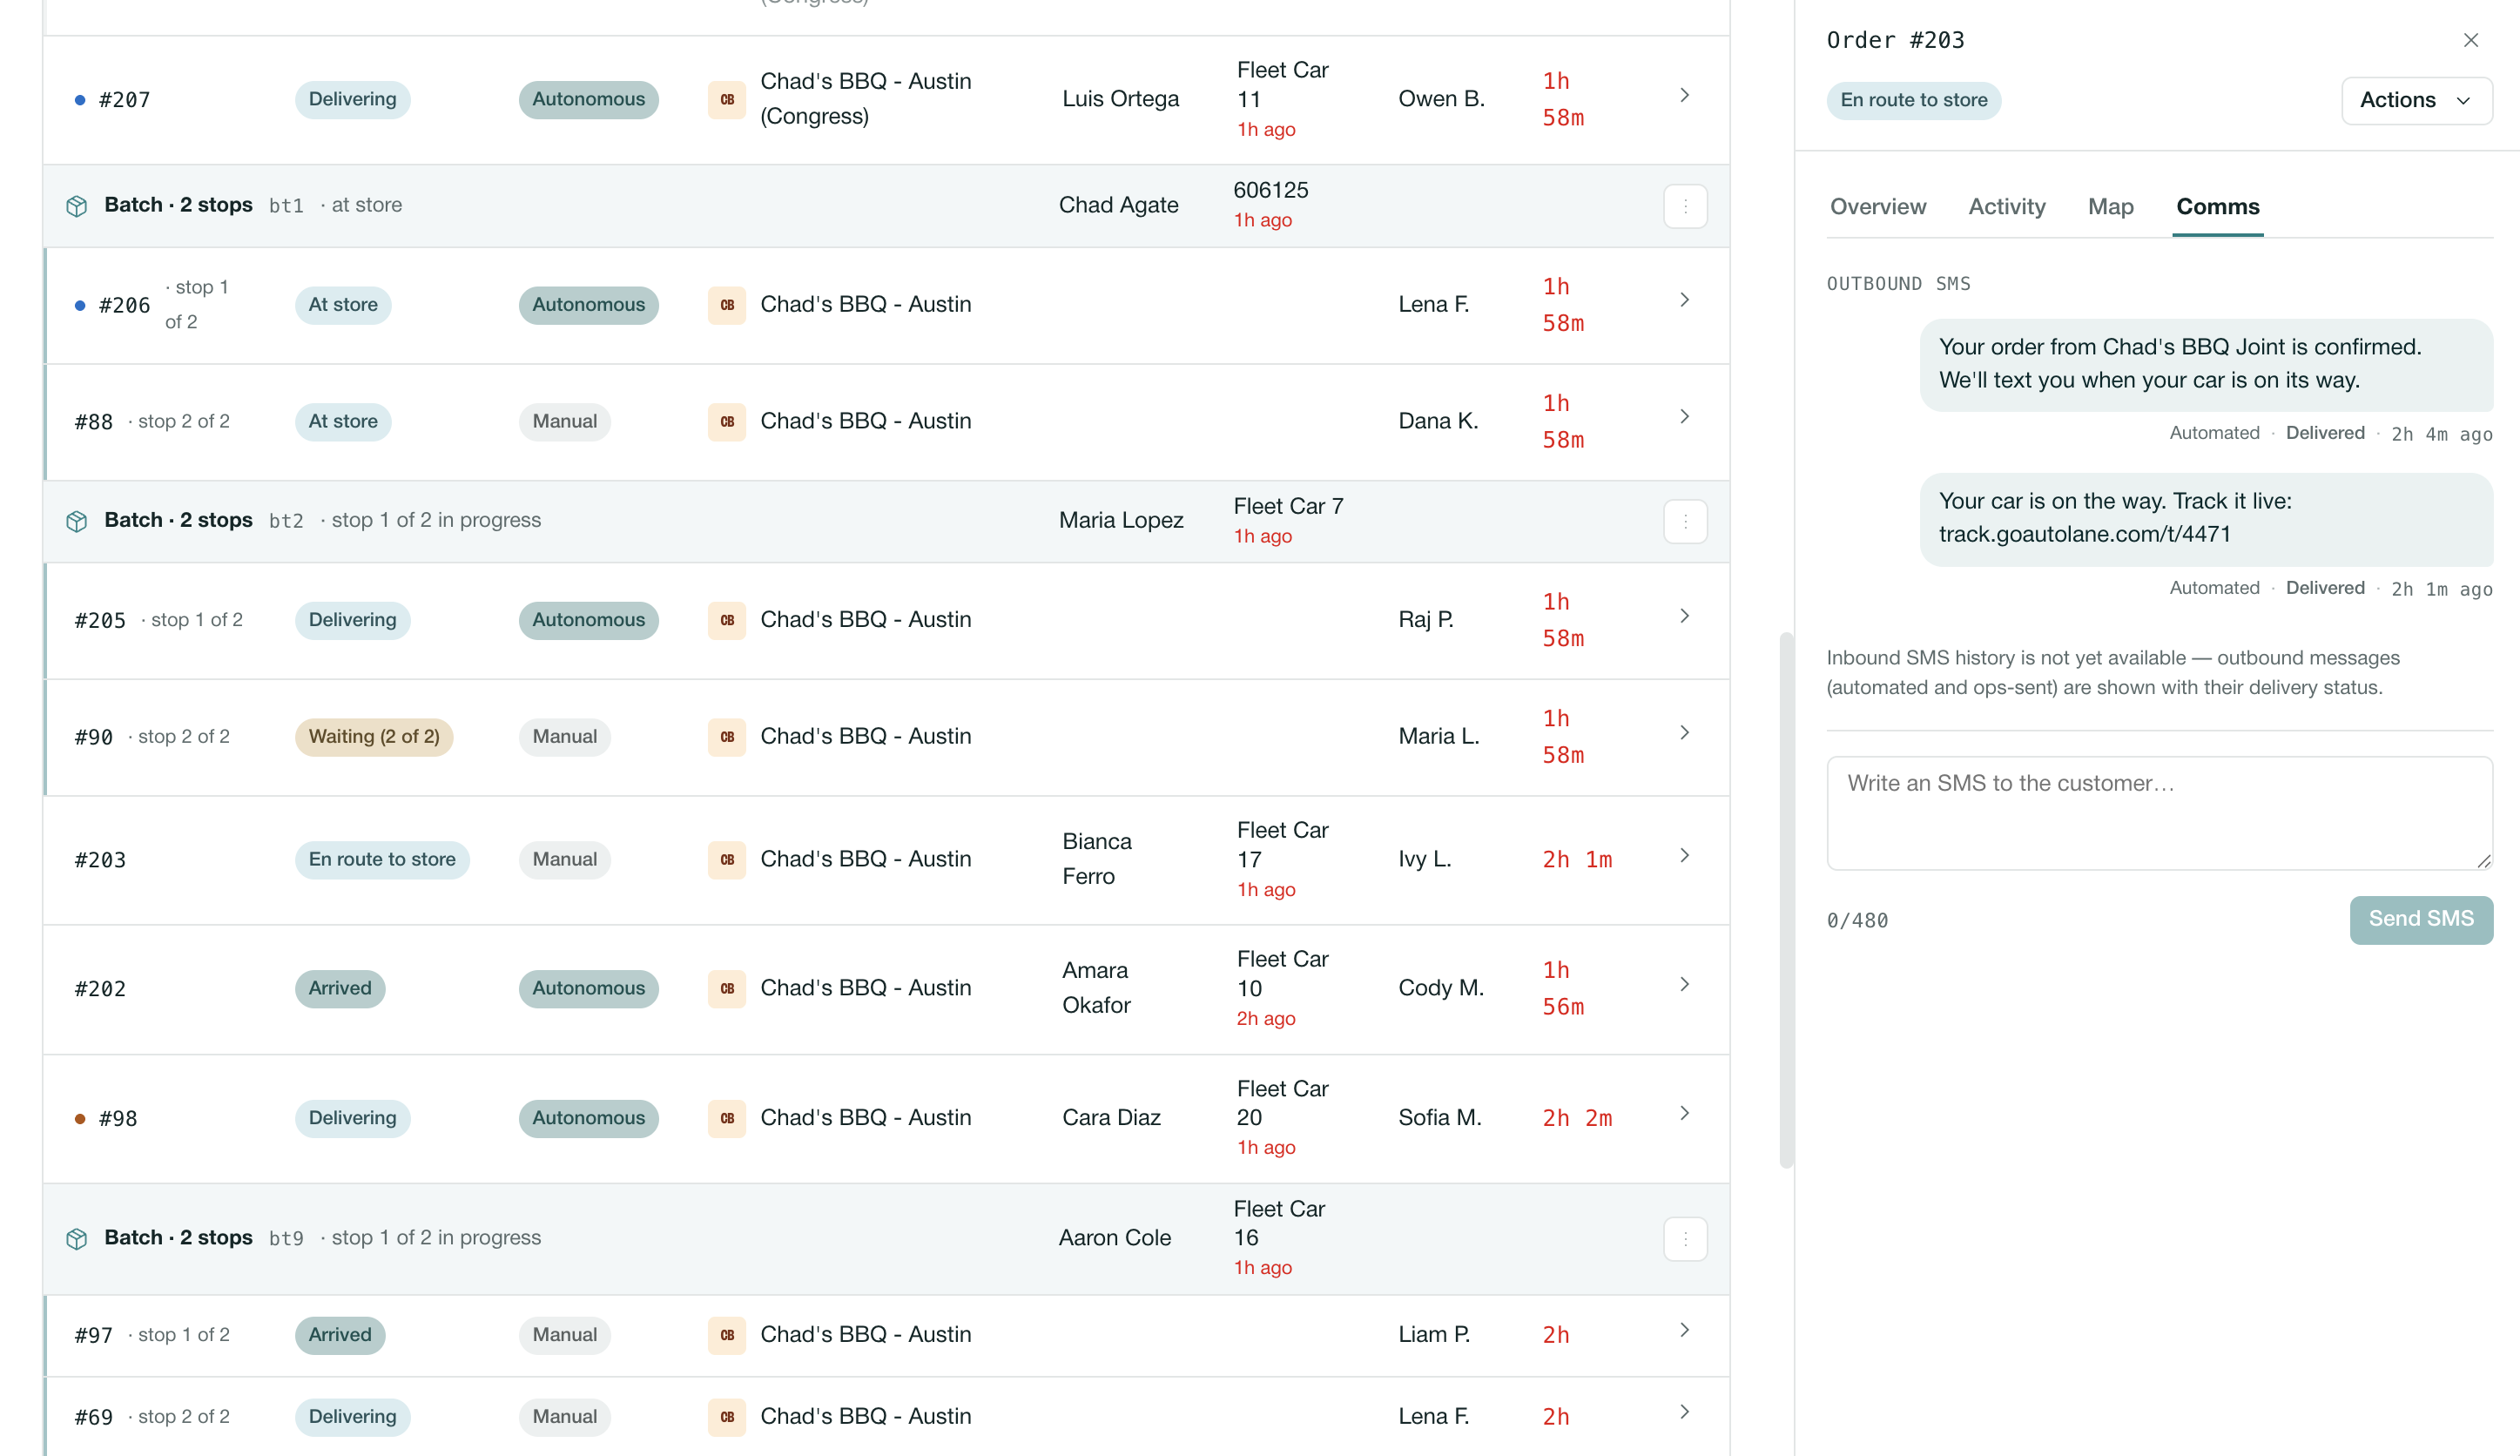
Contacting the End User
You have two ways to reach an End User, both from the Order detail drawer. You must be on Dispatch for calling to work (see above).
SMS – send from the Operations Console. Use this first; it's less intrusive and leaves a record.
Call – click-to-call the End User. The system connects you with your number protected; you never handle their raw number.
If the number bounces or the phone icon reaches the store instead of the End User, the store likely entered its own number – fall back to the building directory or have the Supervisor knock. If there's no response at all: leave at the door, photo, log a manual delivery.
Handling an End User ticket (Intercom)
End User support runs in Intercom, a separate tool from the Operations Console.
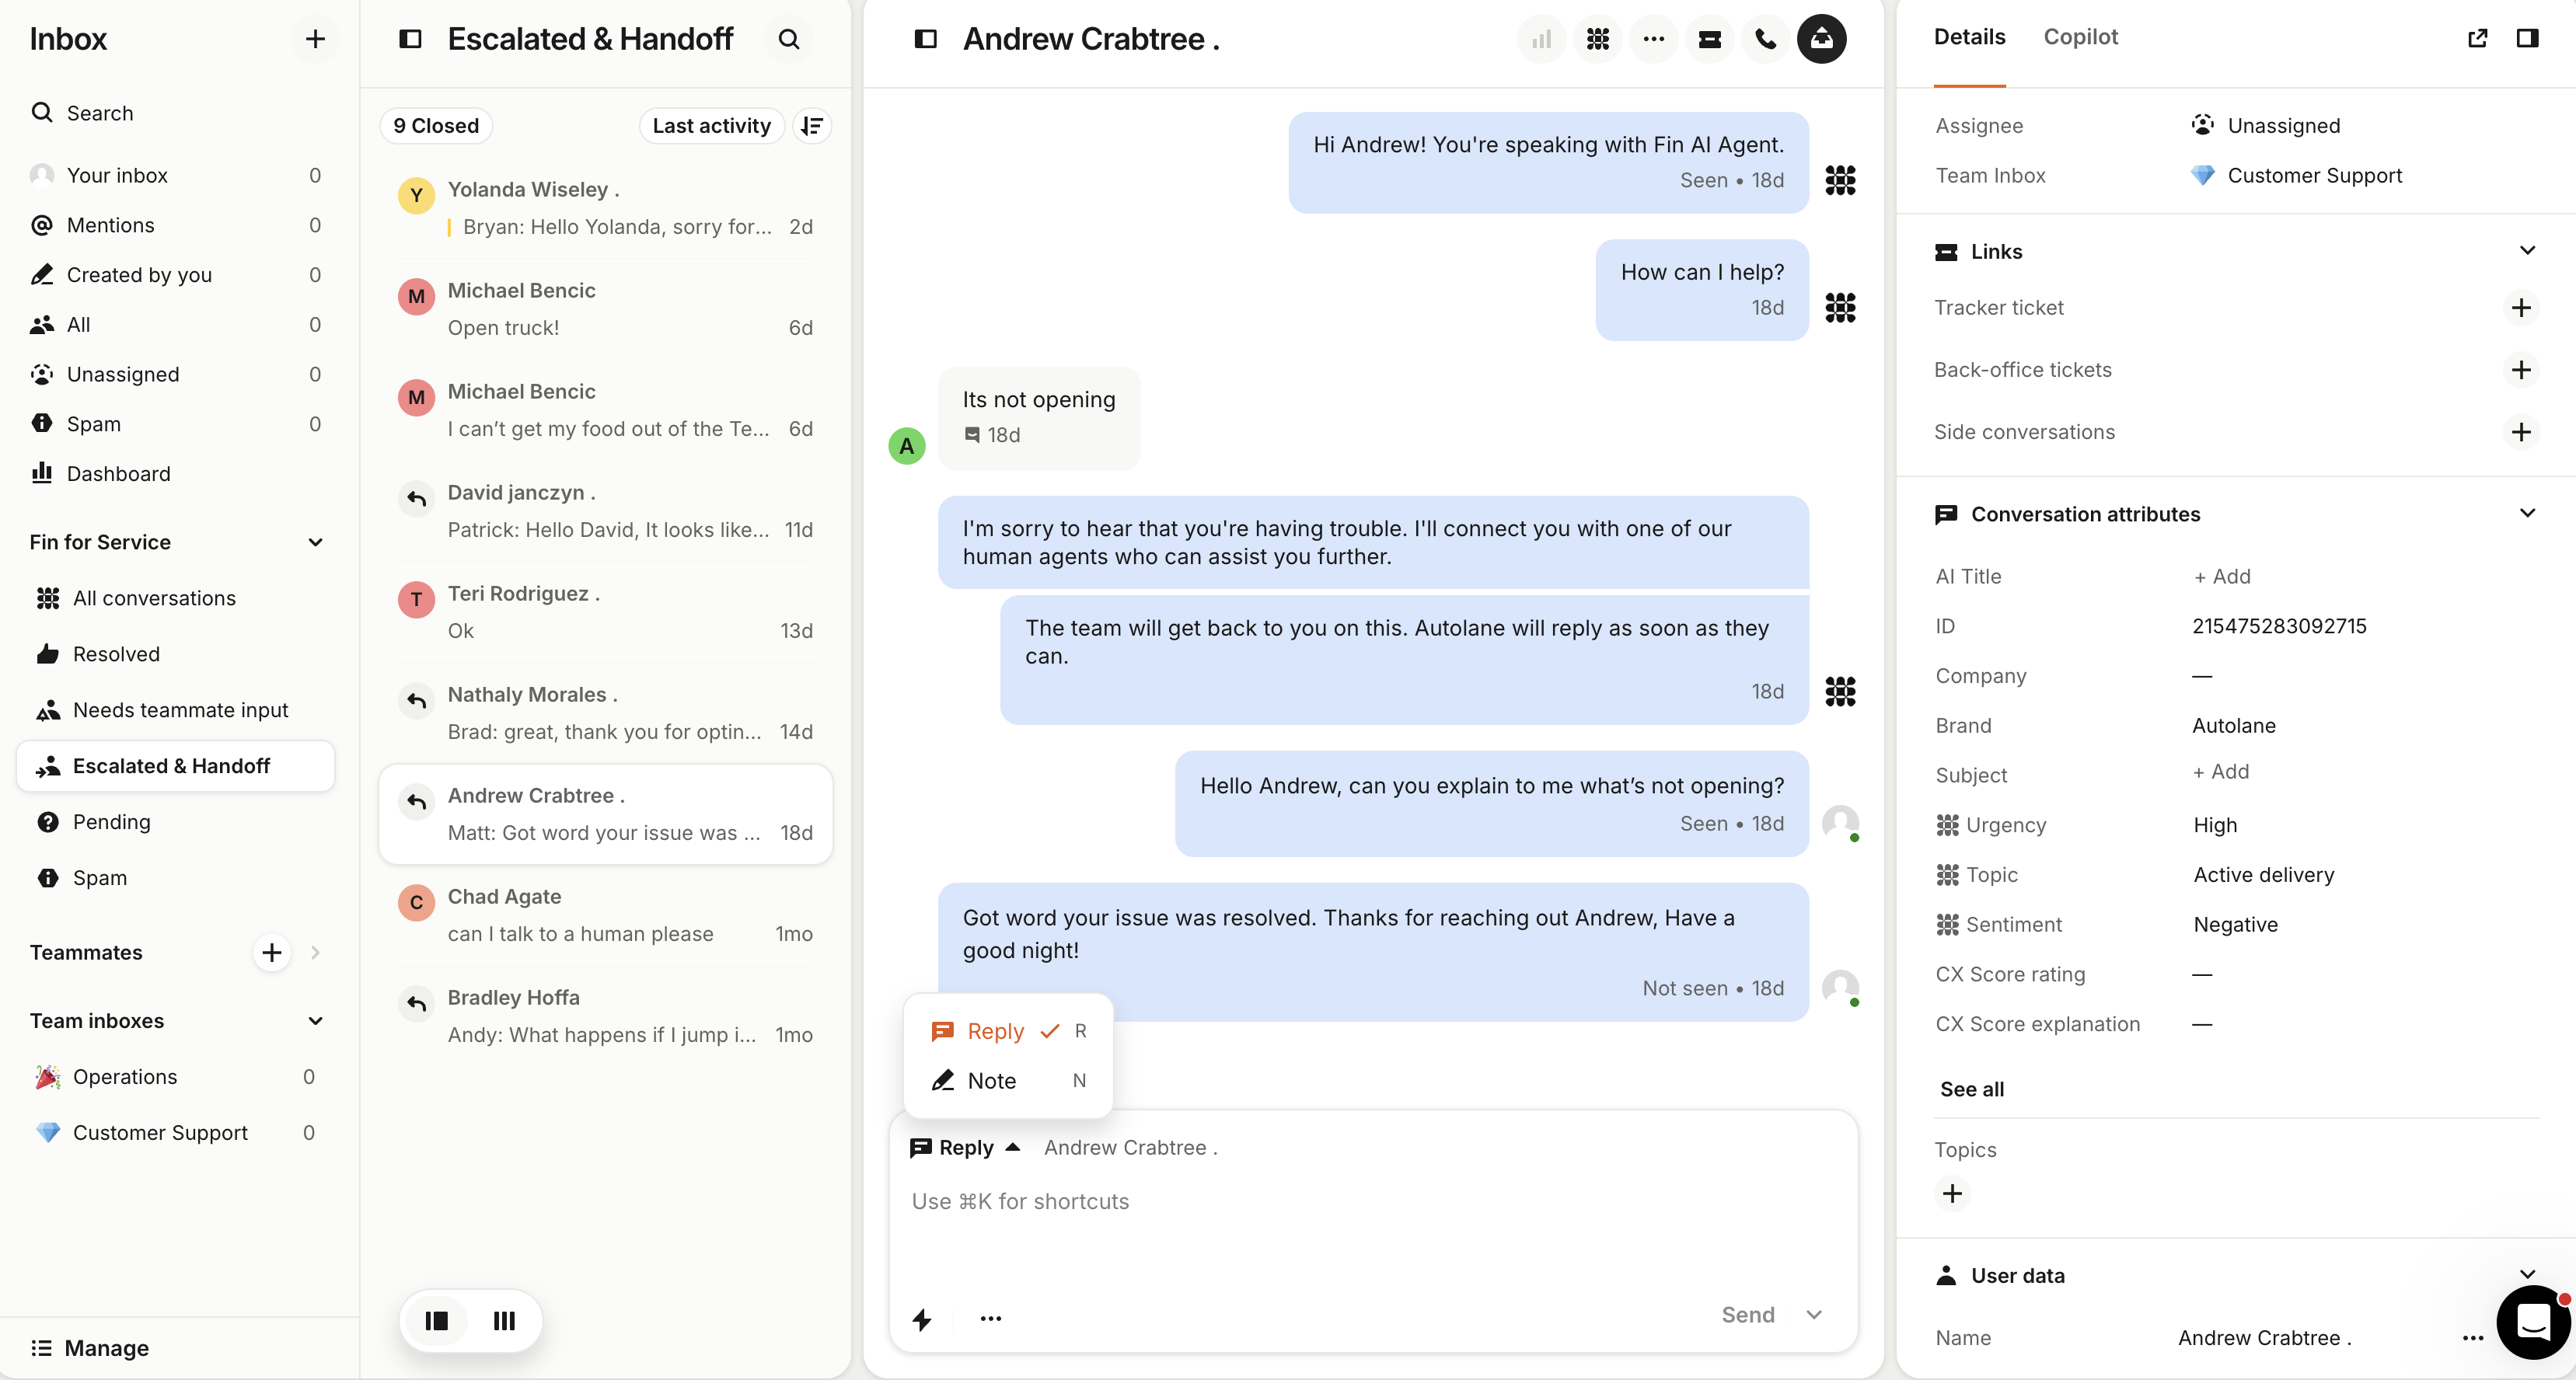
Fin runs the conversation, not you. Fin (our AI agent) handles End User chats end to end — it answers questions, reads delivery status, and resolves most tickets on its own. Avoid jumping into live Fin conversations unless Fin is clearly misreading the end-users' request. Otherwise, you step in only when Fin escalates or hands off to a human – at that point the conversation is assigned to you in the Operations inbox, and it's yours to work with.
When a handed-off conversation lands with you:
Pick it up promptly – the End User has already waited through the handoff.
Reply to respond to the End User. Use the Reply action, not Note — a Note is internal-only and the End User never sees it.
Work the issue (fix it in the Operations Console, contact the End User, escalate via @ops as needed).
When it's resolved, Close the ticket. Don't leave handed-off conversations open.
Use the macros. Intercom has a set of saved replies (macros) so common answers stay consistent and fast. To insert one, click the lightning bolt at the bottom of the reply box (or press \) and pick the macro. Check the auto-filled fields (First name, Owner name) actually populated, then adapt it to the real situation — a macro is a starting point, not a script, and the Dispatch Conduct standard still governs your tone.
Conduct. You're representing Autolane directly to the End User, so hold to the Dispatch Conduct standard: warm, human, and honest; set realistic expectations; and translate everything into plain language.
Opening the trunk remotely
The End User opens the trunk themselves – that's the autonomous experience. Remote trunk open is a last resort, not a convenience.
The Supervisor should not open the trunk. Opening it by hand breaks the autonomous experience – even during the supervised phase, the whole point is that the End User retrieves their own order. This is a remote, Dispatch-side action.
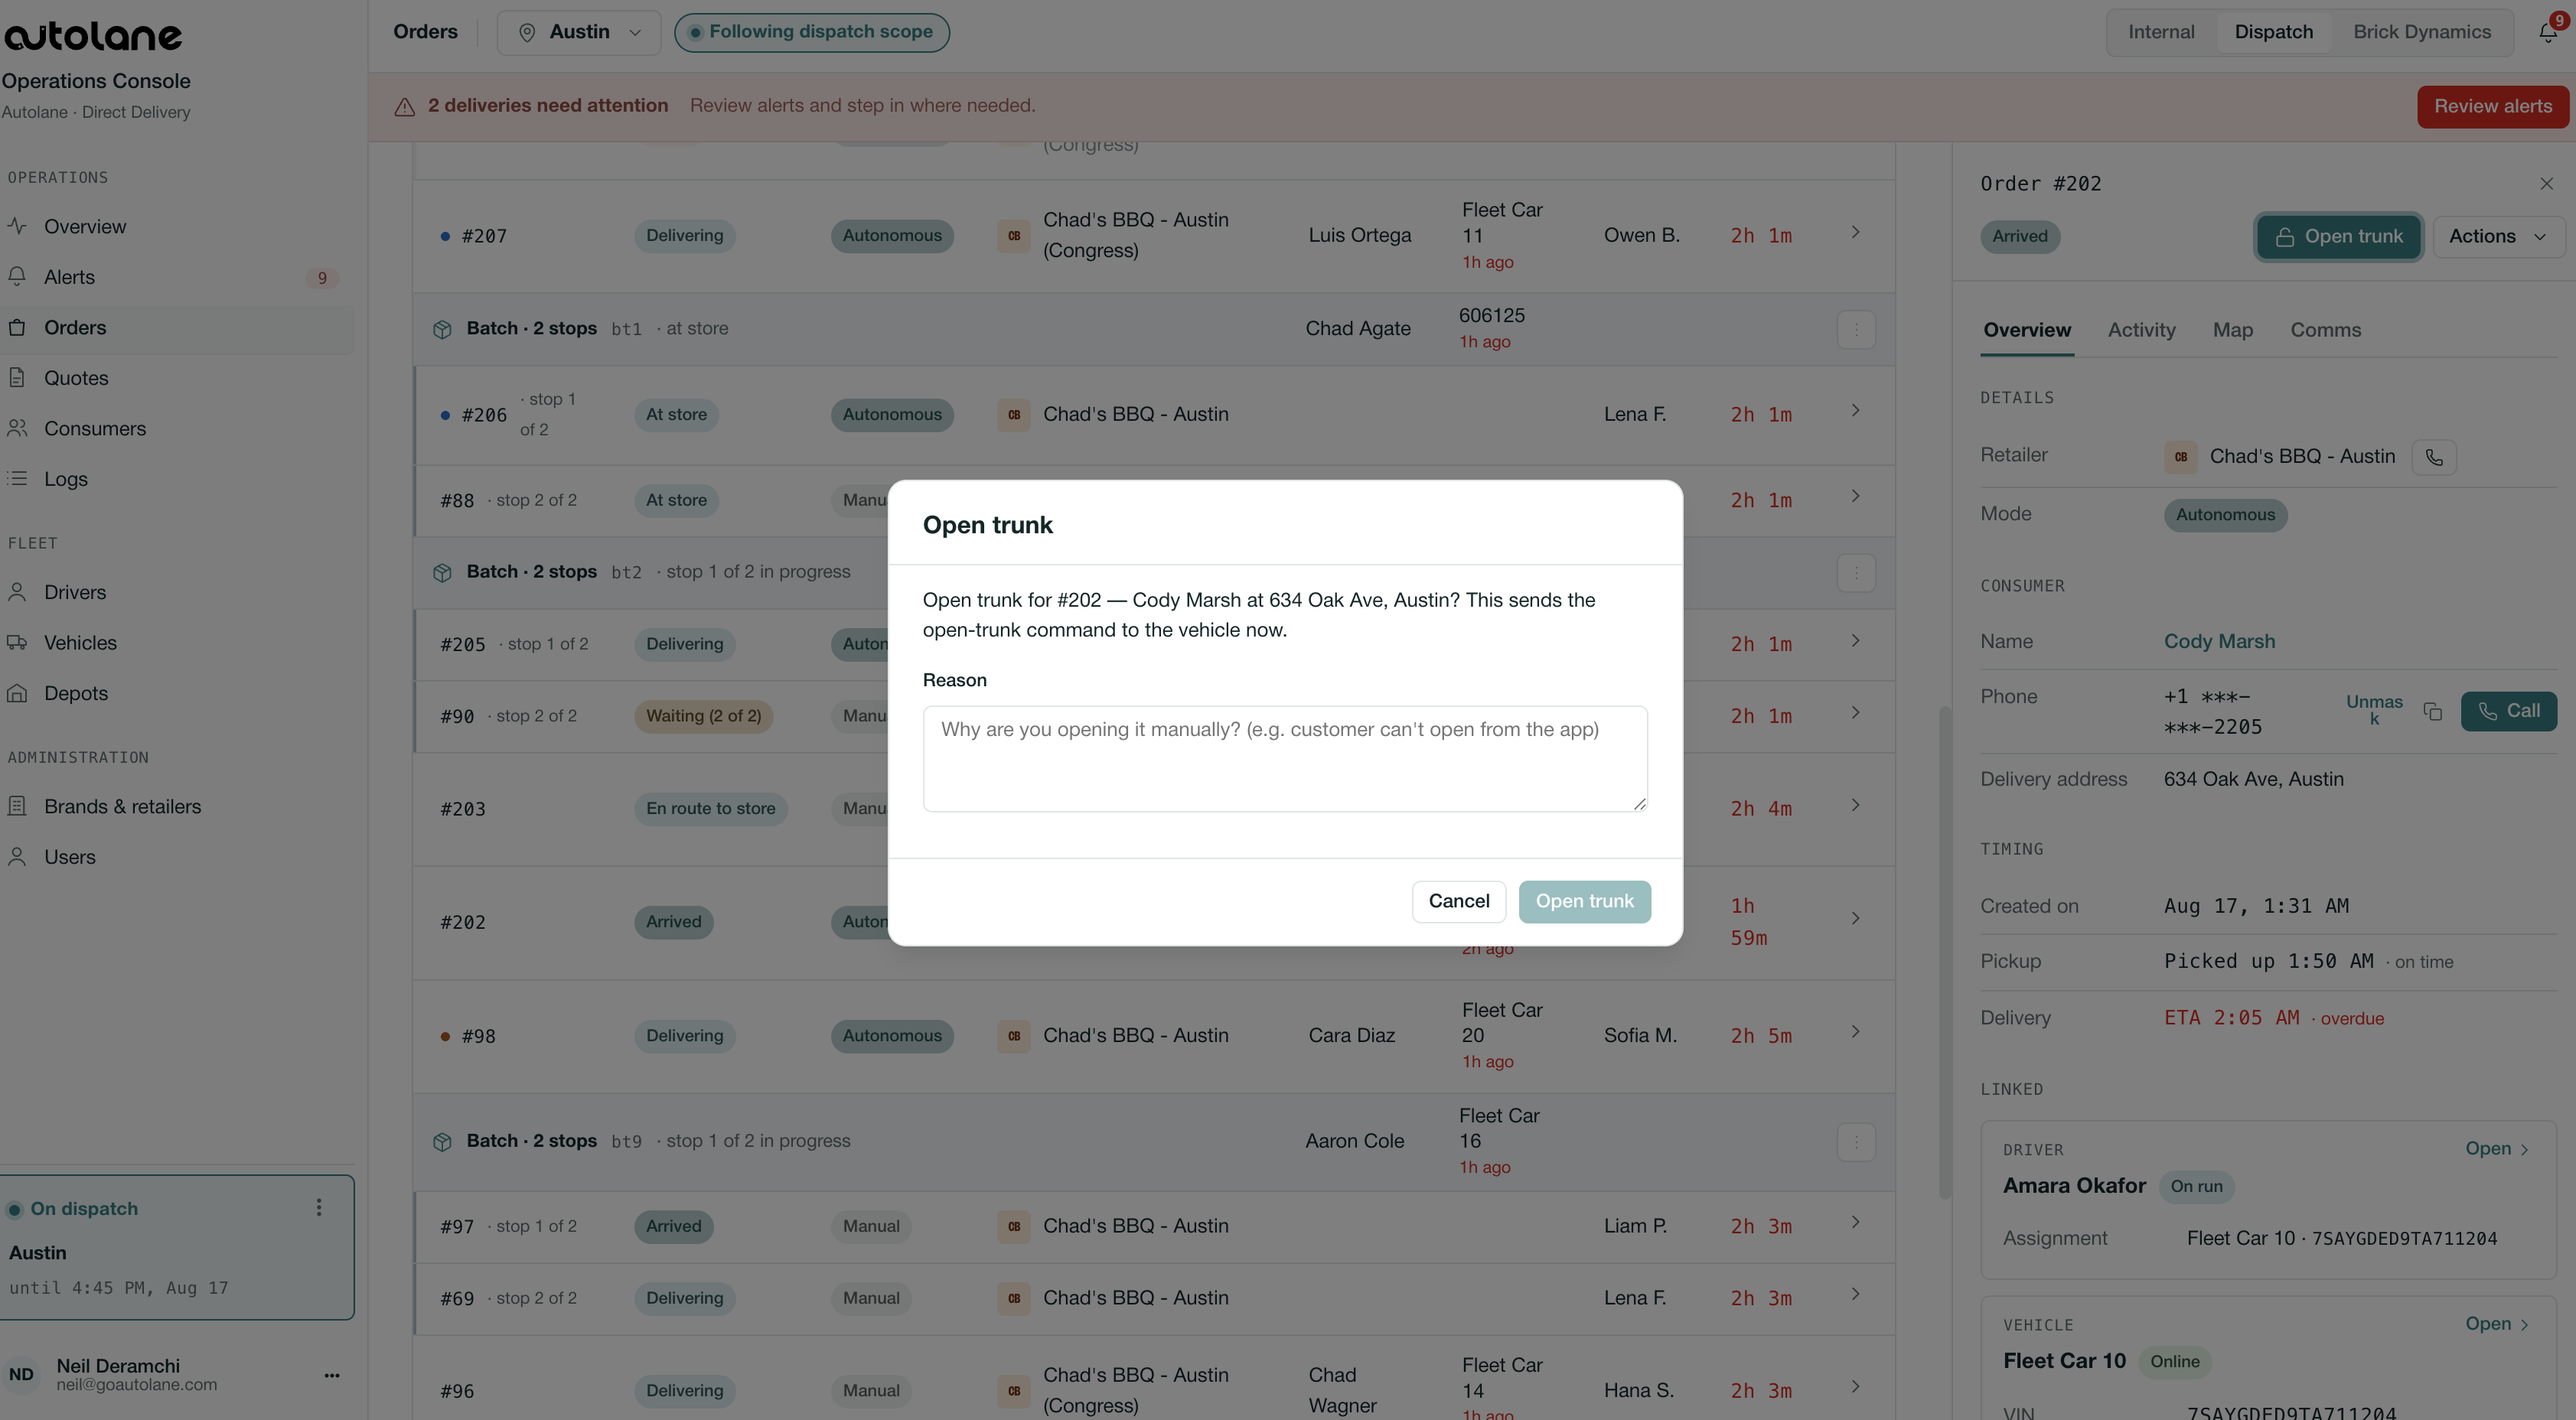
Only open it remotely after the End User has failed to troubleshoot via Intercom. If they can't get it open themselves and support couldn't walk them through it, then you open it from the Operations Console.
When it's the last resort:
In Orders, open the run.
Actions → Open trunk.
Confirm, and note it as an exception. This action is only available on Orders in the Delivering state.
Working an alert
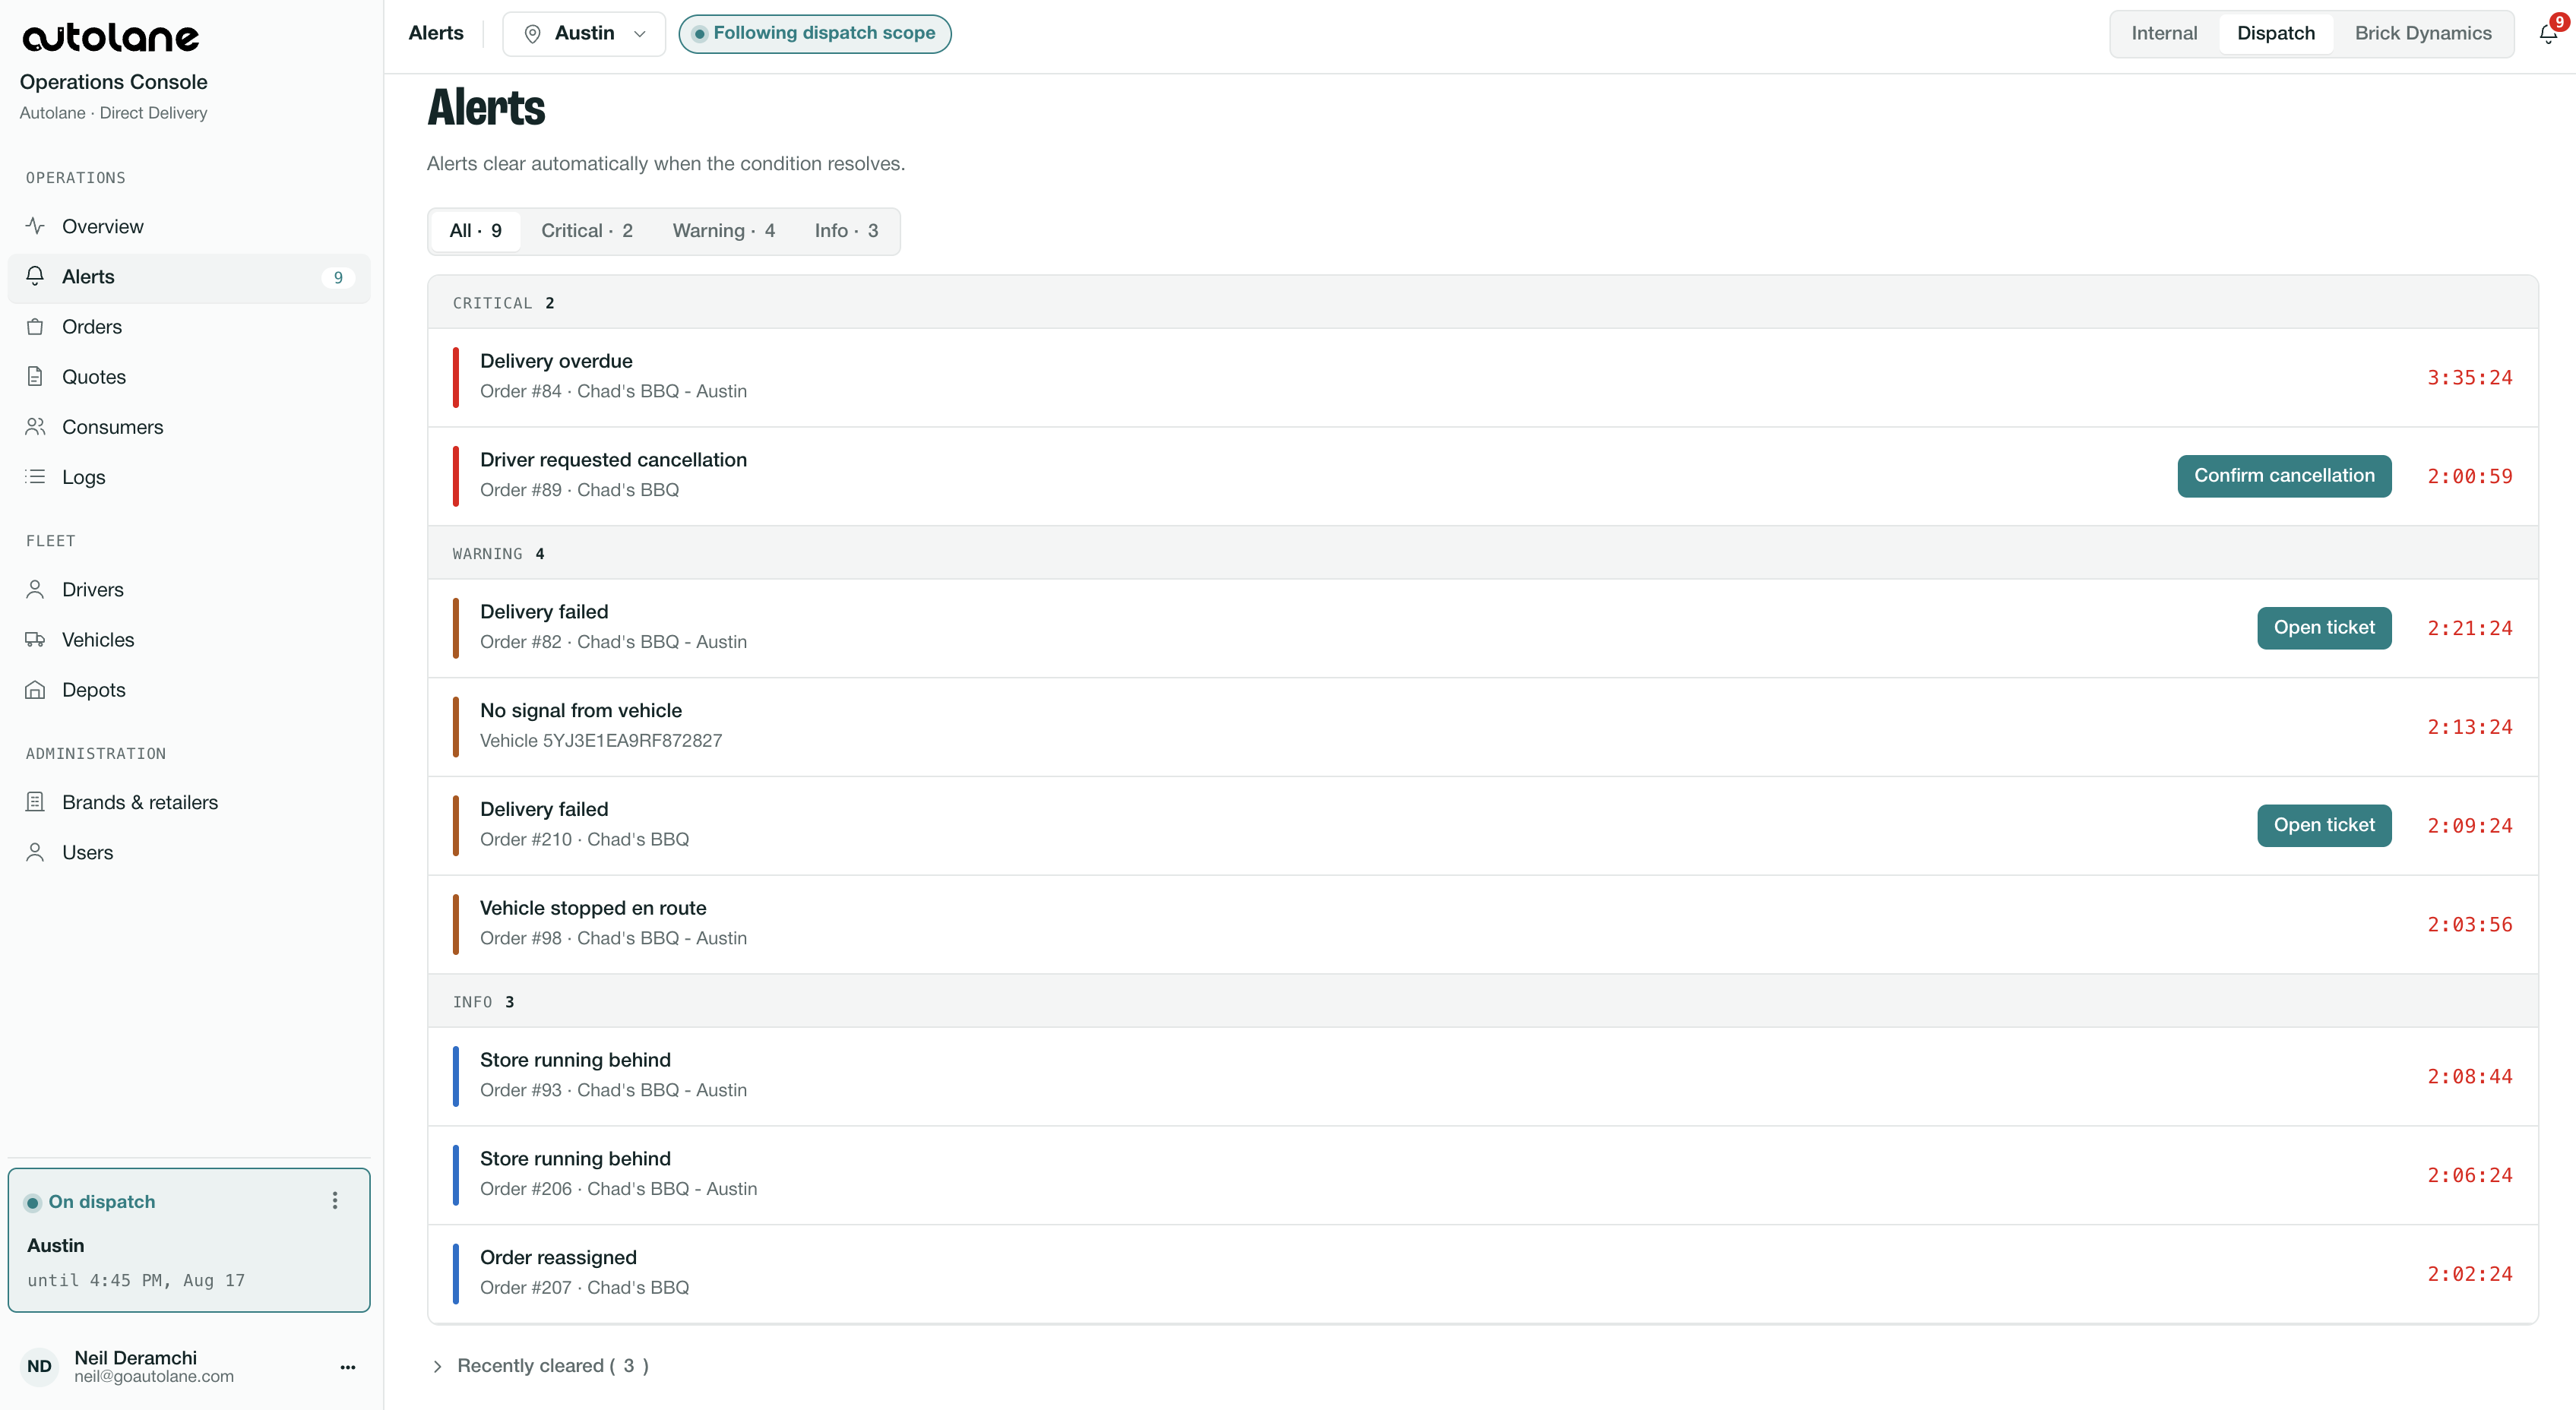
The Alerts tab is the system flagging things for you. What each alert is — what fires it, what clears it, and what to do — lives in one place, the Ops Alert Catalog. Consult the catalog for definitions of alerts; this section is just how you act on one.
Severity tells you urgency: critical (act now), warning (investigate), info (awareness).
Act from the card. A couple of alerts (Dispatch SLA, Vehicle stationary) offer Reassign options; every other card opens the order so you can work it there.
Alerts clear themselves once the problem goes away. Don't manually clear one while the issue is still happening — it'll just come back.
When it's beyond what you can fix, escalate via @ops (Running Dispatch → Escalation).
For the full list — every alert, what triggers it, and what it means — see the Ops Alert Catalog.
Logging an exception
Required on every skip, reassignment, manual completion, or anything that didn't go to plan (Running Dispatch → duty 5). You log on the order itself, in the Activity tab.
Open the relevant order or run.
Add a note to its activity describing what happened and what you did.
Keep it factual and short – the order's activity trail is where the next person and Autolane will look.